
Unity SDK
SDK Installation
Airbridge Unity SDK supports Unity version
2018.4or above.
The Airbridge Unity SDK uses unity-jar-resolver(External Dependency Manager for Unity) to manage library dependencies.
If you're using Unity SDK v1.9.2 or lower, please refer to this page and finish the Unity package setup.
Airbridge Unity SDK v1.9.3+ automatically imports all Airbridge plugins and EDM4U assets, therefore any additional settings are unnecessary for the Unity package.
Package Installation
- Download the latest version of the Airbridge Unity SDK.
- Go to "Assets → Import Package → Custom Package..." and import the downloaded package file.
- The AB180 tab will appear in the menu once the package is installed.
Project Setup
Click "AB180 → Airbridge Settings" to see the following screen.
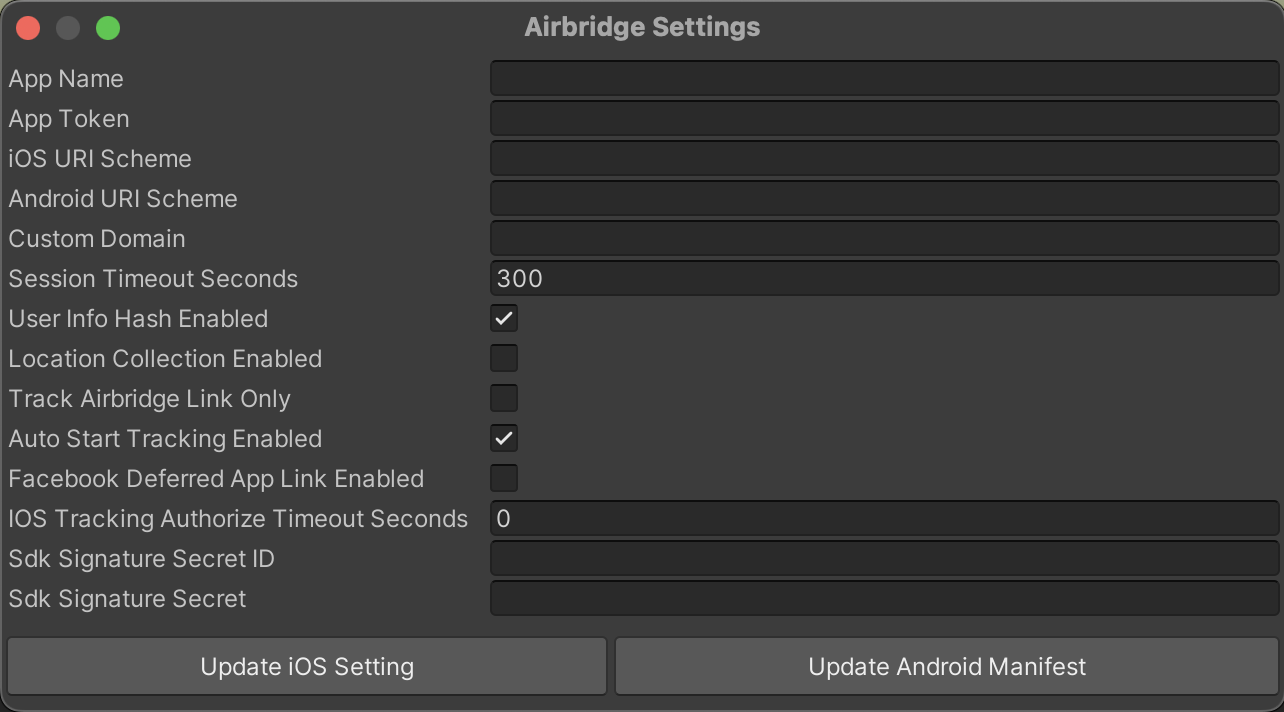
Press "Update iOS App Setting" or "Update Android Manifest" to apply the changes.
If you want to customize or merge the
AndroidManifestfile, please refer to "Project → Plugins → Airbridge → Android → AndroidManifest.xml".
App Information Setup
Fill in the "App Name" and "App Token" fields at "AB180 → Airbridge Settings".
This information can be found at the "Airbridge dashboard → Settings → Tokens".

Initialization
No additional initialization is required for the Airbridge Unity SDK. However, migration might be required for particular cases depending on the platform.
Testing the SDK
Check if install events are sent when the application is installed and opened.
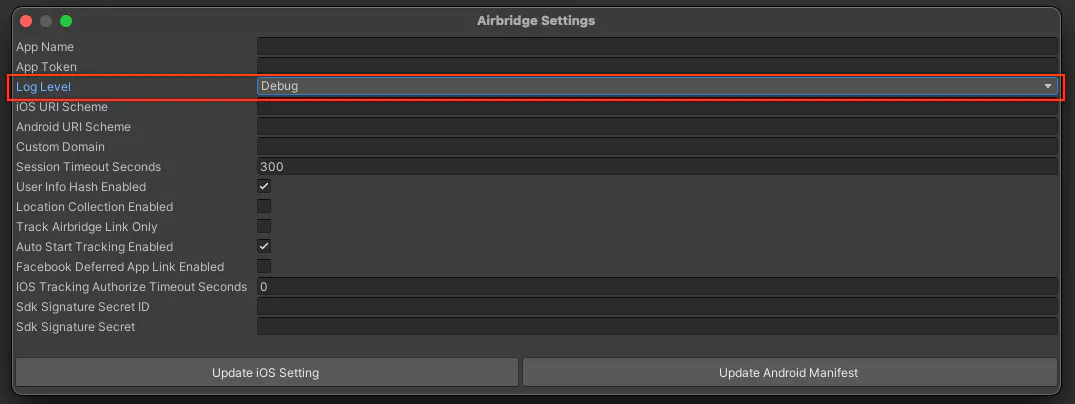
Check with Logs
Use the "AB180 → Airbridge Settings → Log Level" menu.
Check in the Airbridge Dashboard
Events from the Airbridge SDK are shown at the "Airbridge Dashboard → Raw Data → App Real-time Logs".
- Go to
Airbridge Dashboard → Raw Data → App Real-time Logs. - Search for the device's ADID (IDFA, IDFV, GAID).

Logs may be delayed for up to 5 minutes.
Deep Link Setup
Dashboard Setup
Please refer to the guides below to setup your deep links in the Airbridge dashboard.
Project Setup
iOS Deep Link Setup
Fill in the "iOS URI Scheme" field at "AB180 → Airbridge Settings".
This information can be found at the "Airbridge dashboard → Tracking Link → Deep Link".

Android Deep Link Setup
Fill in the "Android URI Scheme" field at "AB180 → Airbridge Settings".
This information can be found at the "Airbridge dashboard → Tracking Link → Deep Link".

Custom Domain Setup (Optional)
The deeplink.page or abr.ge domains are available when creating a tracking link at the Airbridge dashboard. Customized URLs such as go.my_company.com/abcd can also be used as tracking links to improve the branding and CTR (Click Through Rate).
-
Please follow this guide to setup custom domains.
-
Fill in the "Custom Domain" field at "AB180 → Airbridge Settings".
Callback Setup
Register an object as below using SetDeeplinkCallback to receive user-clicked deep link data.
private void Awake()
{
	AirbridgeUnity.SetDeeplinkCallback("AirbridgeManager");
}
Airbridge will receive the deep link URL once SetDeeplinkCallback is set as above.
using UnityEngine;

public class AirbridgeManager : MonoBehaviour
{
  private void Awake() {
    Airbridge.SetDeeplinkCallback("AirbridgeManager");
  }

  // Method will be called by Airbridge when deeplink detected
  private void OnTrackingLinkResponse(string url)
  {

  }
}The Airbridge Unity SDK uses Unity's
UnitySendMessagemethod to forward deep link information.
Test Deep Link
Click on your URI scheme to test if your deep link has been properly set up in the Airbridge SDK.
YOUR_APP_URI_SCHEME://
The results will show on the "Airbridge dashboard → Raw Data → App Real-time Log" page if everything is working.

User Setup
User Identifier Setup
To measure the fragmented contributions of users between web and app, Airbridge collects the following user identifier information.
- User Email: Email address
- User Phone: Phone number
- User ID: Unique User ID (The ID value that specifies the user must be the same in both web and mobile)
- User Alias: Identifiers that can represent users (e.g. loyalty program ID, affiliate integrated ID, etc)
The user's email and phone numbers are hashed (SHA256) by default and then sent to servers.
You can set the user identifier as below for the SDK.
Dictionary<string, string> alias = new Dictionary<string, string>();
AirbridgeUser user = new AirbridgeUser();
user.SetId("personID");
user.SetEmail("[email protected]");
user.SetPhoneNumber("1(123)123-1234");
user.SetAlias("key", "value");
AirbridgeUnity.SetUser(user);| Name | Description | Limitations |
|---|---|---|
Id |
User ID |
|
User email |
Hashed by default |
|
PhoneNumber |
User phone number |
Hashed by default |
Alias |
User alias |
|
Once the user identifier has been configured, all events will be forwarded with the corresponding identity information.
The user identifier properties can be reset or overwritten through user events.
User Attribute Setup
Additional user attributes can be used for more accurate Multi-Touch Attribution (MTA) analyses, additional internal data analyses, and linking third-party solutions.
Dictionary<string, object> attrs = new Dictionary<string, object>();
AirbridgeUser user = new AirbridgeUser();
user.SetAttributes("key", "value");
AirbridgeUnity.SetUser(user);| Name | Description | Limitations |
|---|---|---|
Attributes |
User attribute |
|
The user attributes can be reset or overwritten through user events.
Testing
Make sure that your user information settings are being properly sent through the SDK.
- Configure user identifier information.
- Send an event using the SDK.
- Click the event at "Airbridge dashboard → Raw Data → App Real-time Logs"
- Check if the user information is correctly sent under the
userblock.

Device Setup
Setup Device Alias
Setup a device alias through the Airbridge SDK. The alias will be sustained even after the app closes, unless otherwise deleted.
AirbridgeUnity.SetDeviceAlias("ADD_YOUR_KEY", "AND_YOUR_VALUE");
AirbridgeUnity.RemoveDeviceAlias("DELETE_THIS_KEY");
AirbridgeUnity.ClearDeviceAlias();| SetDeviceAlias(string key, string value) | Add the key value pair to the device identifier. |
| RemoveDeviceAlias(string key) | Delete the corresponding device alias. |
| ClearDeviceAlias() | Delete all device aliases. |
Event Setup
When important user actions occur, in-app events can be sent to measure performance by channel.
All event parameters are optional. However, more information about the event will help provide a more accurate analysis.
All events called by the Airbridge SDK can be sent with the following fields.
| Name | Type | Description |
|---|---|---|
Event Category |
String |
Name of the event |
Event Action |
String |
Event attribute 1 |
Event Label |
String |
Event attribute 2 |
Event Value |
Float |
Event attribute value |
Event Custom Attributes |
Dictionary<string, object> |
Custom attributes |
Event Semantic Attributes |
Dictionary<string, object> |
Semantic attributes |
Standard Events
Send standard user events with the SDK.
action,label,value,attributescan also be used when sending standard events.
Sign Up
Dictionary<string, string> alias = new Dictionary<string, string>();
AirbridgeUser user = new AirbridgeUser();
user.SetId("personID");
user.SetEmail("[email protected]");
user.SetPhoneNumber("1(123)123-1234");
user.SetAlias("alias1", "value");
AirbridgeUnity.SetUser(user);

AirbridgeEvent @event = new AirbridgeEvent(Airbridge.Constants.CATEGORY.SIGN_UP);
AirbridgeUnity.TrackEvent(@event);
Sign In
Dictionary<string, string> alias = new Dictionary<string, string>();
AirbridgeUser user = new AirbridgeUser();
user.SetId("personID");
user.SetEmail("[email protected]");
user.SetPhoneNumber("1(123)123-1234");
user.SetAlias("alias1", "value");
AirbridgeUnity.SetUser(user);

AirbridgeEvent @event = new AirbridgeEvent(Airbridge.Constants.CATEGORY.SIGN_IN);
AirbridgeUnity.TrackEvent(@event);
Sign Out
AirbridgeEvent @event = new AirbridgeEvent(Airbridge.Constants.CATEGORY.SIGN_OUT);
AirbridgeUnity.TrackEvent(@event);
AirbridgeUnity.ExpireUser();All user identifier properties will disappear after
sign outis called.
Airbridge.Ecommerce.Product cocacola = new Airbridge.Ecommerce.Product();
cocacola.SetId("beverage_1");
cocacola.SetName("Coca Cola");
cocacola.SetPrice(1.25);
cocacola.SetCurrency("USD");
cocacola.SetQuantity(1);
cocacola.SetPosition(0);
View Home Screen
AirbridgeEvent @event = new AirbridgeEvent(Airbridge.Constants.CATEGORY.VIEW_HOME);
AirbridgeUnity.TrackEvent(@event);
View Search Result
List<Airbridge.Ecommerce.Product> beverages = new List<Airbridge.Ecommerce.Product>();
Airbridge.Ecommerce.Product cocacola = new Airbridge.Ecommerce.Product();
cocacola.SetId("beverage_1");
cocacola.SetName("Coca Cola");
cocacola.SetPrice(1.25);
cocacola.SetCurrency("USD");
cocacola.SetQuantity(1);
cocacola.SetPosition(0);
beverages.Add(cocacola);

Airbridge.Ecommerce.Product fanta = new Airbridge.Ecommerce.Product();
fanta.SetId("beverage_2");
fanta.SetName("Fanta");
fanta.SetPrice(10.99);
fanta.SetCurrency("USD");
fanta.SetQuantity(1);
fanta.SetPosition(1);
beverages.Add(fanta);

AirbridgeEvent @event = new AirbridgeEvent(Airbridge.Constants.CATEGORY.VIEW_SEARCH_RESULT);
@event.SetQuery("SELECT * FROM beverages");
@event.SetProducts(beverages.ToArray());
@event.SetTotalValue(12.24);
AirbridgeUnity.TrackEvent(@event);
View Product List
List<Airbridge.Ecommerce.Product> beverages = new List<Airbridge.Ecommerce.Product>();
Airbridge.Ecommerce.Product cocacola = new Airbridge.Ecommerce.Product();
cocacola.SetId("beverage_1");
cocacola.SetName("Coca Cola");
cocacola.SetPrice(1.25);
cocacola.SetCurrency("USD");
cocacola.SetQuantity(1);
cocacola.SetPosition(0);
beverages.Add(cocacola);

Airbridge.Ecommerce.Product fanta = new Airbridge.Ecommerce.Product();
fanta.SetId("beverage_3");
fanta.SetName("Fanta");
fanta.SetPrice(10.99);
fanta.SetCurrency("USD");
fanta.SetQuantity(1);
fanta.SetPosition(2);
beverages.Add(fanta);

AirbridgeEvent @event = new AirbridgeEvent(Airbridge.Constants.CATEGORY.VIEW_PRODUCT_LIST);
@event.SetProductListId("beverage_list_0");
@event.SetProducts(beverages.ToArray());
@event.SetTotalValue(12.24);
AirbridgeUnity.TrackEvent(@event);
View Product Detail
Airbridge.Ecommerce.Product cocacola = new Airbridge.Ecommerce.Product();
cocacola.SetId("beverage_1");
cocacola.SetName("Coca Cola");
cocacola.SetPrice(1.25);
cocacola.SetCurrency("USD");
cocacola.SetQuantity(1);
cocacola.SetPosition(0);

AirbridgeEvent @event = new AirbridgeEvent(Airbridge.Constants.CATEGORY.VIEW_PRODUCT_DETAILS);
@event.SetProducts(cocacola);
AirbridgeUnity.TrackEvent(@event);
Add To Cart
Airbridge.Ecommerce.Product cocacola = new Airbridge.Ecommerce.Product();
cocacola.SetId("beverage_1");
cocacola.SetName("Coca Cola");
cocacola.SetPrice(1.25);
cocacola.SetCurrency("USD");
cocacola.SetQuantity(1);
cocacola.SetPosition(0);

AirbridgeEvent @event = new AirbridgeEvent(Airbridge.Constants.CATEGORY.ADD_TO_CART);
@event.SetProducts(cocacola);
@event.SetTotalValue(1.25);
AirbridgeUnity.TrackEvent(@event);
Purchase
List<Airbridge.Ecommerce.Product> beverages = new List<Airbridge.Ecommerce.Product>();
Airbridge.Ecommerce.Product cocacola = new Airbridge.Ecommerce.Product();
cocacola.SetId("beverage_1");
cocacola.SetName("Coca Cola");
cocacola.SetPrice(1.25);
cocacola.SetCurrency("USD");
cocacola.SetQuantity(1);
cocacola.SetPosition(0);
beverages.Add(cocacola);

Airbridge.Ecommerce.Product fanta = new Airbridge.Ecommerce.Product();
fanta.SetId("beverage_3");
fanta.SetName("Fanta");
fanta.SetPrice(10.99f);
fanta.SetCurrency("USD");
fanta.SetQuantity(1);
fanta.SetPosition(2);
beverages.Add(fanta);

AirbridgeEvent @event = new AirbridgeEvent(Airbridge.Constants.CATEGORY.ORDER_COMPLETE);
@event.SetTransactionId("transaction_123");
@event.SetProducts(beverages.ToArray());
@event.SetInAppPurchased(true);
@event.SetTotalValue(12.24);
AirbridgeUnity.TrackEvent(@event);
Custom Events
Send custom events with the SDK.
AirbridgeEvent @event = new AirbridgeEvent("category");
@event.SetAction("action");
@event.SetLabel("label");
@event.SetValue(9999);
@event.AddCustomAttribute("custom_key", "value");
@event.AddSemanticAttribute("query", "query_123");
AirbridgeUnity.TrackEvent(@event);To configure and deliver
Semantic Attributesdirectly, please refer to this guide.
Verify Event Transmission
Make sure that the events are being properly sent through the SDK.
- Send an event with the SDK.
- Check if the event shows up at "Airbridge dashboard → Raw Data → App Real-time Logs".

Advanced Setup
SDK Signature Setup
Protection against SDK spoofing is possible once you input the "SDK Signature Secret ID" and "SDK Signature Secret" values in the "AB180 -> Airbridge Settings menu".
Please ask your CSM for the "SDK Signature Secret ID" and "SDK Signature Secret" values.
Hash User Indentifier
Email addresses and phone numbers are hashed by default. (SHA256)
Settings can be changed by configuring the "User Info Hash Enabled" field at "AB180 → Airbridge Settings".
Other security measures must be taken internally when sensitive personal information such as "User Email" and "User Phone" is being handled.
Session Timeout Setup
The Airbridge Unity SDK does not send app open events again if the user reopens the app within the time configured at the "Session Timeout Seconds" field at "AB180 → Airbridge Settings".
Session timeout is in milliseconds and must range between 0 and 604800000 (7 days).
Default value is 1000 60 5 (5 minutes).
Privacy Protection
Configure the "Auto Start Tracking Enabled" field at "AB180 → Airbridge Settings" if privacy laws apply. Data should only be collected and transferred with consent. (e.g GDPR, CCPA).
When this feature is disabled, the following functions must be explicitly called for proper data collection
AirbridgeUnity.StartTracking();
Track Airbridge Link Only
If it is difficult to see the performance of re-engagement through Airbridge at a glance due to too many deep link actions within the advertiser's app, "Track Airbridge Link Only" field at "AB180 → Airbridge Settings" can be used to only filter results received through Airbridge deep links.
This option will measure deep links only if the following requirements are met.
- The app is opened through a
airbridge.iolink- The app is opened through a
deeplink.pagelink- The app is opened through a Custom Domain Setup that is registered on the Airbridge dashboard
- The app is opened through a link that contains
airbridge_referrerinformation in the query
Location Collection (Android only)
Airbridge Unity SDK can collect user location information through the "Location Collection Enabled" field at "AB180 → Airbridge Settings"
Location information must be collected for legal purposes through legal methods.
Facebook Deferred App Links
You can receive Facebook Deferred App Links from the Airbridge Unity SDK through by configuring "Facebook Deferred App Link Enabled" at "AB180 → Airbridge Settings".
The Facebook SDK setting must be installed in advance to use this feature.
See - https://developers.facebook.com/docs/unity/
Tracking Authorize Timeout (iOS only)
When the AppTrackingTransparency.framework is used to present an app-tracking authorization request to the user, IDFA will not be collected when the install event occurs because the install event occurs before the selection.
The "iOS Tracking Authorize Timeout Seconds" field at "AB180 → Airbridge Settings" allows you to delay the transmission of installation events so that the IDFA value may be included.
Uninstall Tracking
This feature is available for only Unity SDK v1.9.0+.
Reference
Android Uninstall Tracking
1. Setup Firebase Cloud Messaging
Please refer to the official Firebase Cloud Messaging documentation for basic app setup.
2. Forward Firebase Push Token
Forward the push token to Airbridge using the RegisterPushToken method.
public void Start() {
  Firebase.Messaging.FirebaseMessaging.TokenReceived += OnTokenReceived;
  Firebase.Messaging.FirebaseMessaging.MessageReceived += OnMessageReceived;
}

public void OnTokenReceived(object sender, Firebase.Messaging.TokenReceivedEventArgs token) {
#if UNITY_ANDROID
  AirbridgeUnity.RegisterPushToken(token.Token);
#endif
}

// Make sure the notification is not shown on the device if the remote message value is airbridge-uninstall-tracking.
public void OnMessageReceived(object sender, Firebase.Messaging.MessageReceivedEventArgs e) {
  if (e.Message.Data.ContainsKey("airbridge-uninstall-tracking")) return;
  ...
}
iOS Uninstall Tracking
1. Setup Apple Push Notification Service
Please refer to the official Unity Mobile Notitifications Package documentation and install the package.
2. Forward Device Token
Forward the device token to Airbridge using the RegisterPushToken method.
void Start()
{
#if UNITY_IOS
  StartCoroutine(RequestAuthorization());
#endif
}

#if UNITY_IOS
IEnumerator RequestAuthorization()
{
  var authorizationOption = AuthorizationOption.Alert | AuthorizationOption.Badge;
  using (var req = new AuthorizationRequest(authorizationOption, true))
  {
    while (!req.IsFinished)
    {
      yield return null;
    };
    if (req.Granted && req.DeviceToken != "")
    {
      AirbridgeUnity.RegisterPushToken(req.DeviceToken);
    }
  }
}
#endif
Hybrid App Setup
Additional events such as app installs, app open and deep link opens can't be tracked with just the web SDK. The following simple setup allows in-app events to be called for a hybrid app.
AirbridgeWebInterface webInterface;
webInterface = AirbridgeUnity.CreateWebInterface(
    "YOUR_WEB_TOKEN",     // web token
    (msg) => $@"..."      // post command function
);
AirbridgeUnity.CreateWebInterface allows you to control the web interface.
Please refer to the Unity Hybird App Integration Guide for more information.
Hybrid app setup is available for Airbridge Unity SDK v1.9.3+.
Troubleshooting
Android
Airbridge Unity SDK does not seem to initialize correctly
- The Airbridge Unity SDK for Android initializes automatically through Content Provider. For proper initialization, the following XML tag must be correctly placed in "Project → Plugins → Android → AndroidManifest.xml".
<provider
	android:authorities="${applicationId}.co.ab180.airbridge.unity.AirbridgeContentProvider"
	android:name="co.ab180.airbridge.unity.AirbridgeContentProvider"
	android:exported="false" />
Using your own custom activity class
- The Airbridge Unity SDK uses custom activities in "UnityPlayerActivity" to get deep link data. If you are using your own custom activity class, please override the following codes inside your custom activity class.
@Override
protected void onNewIntent(Intent intent) {
  super.onNewIntent(intent);
  setIntent(intent);
}

@Override
protected void onResume() {
  super.onResume();
  AirbridgeUnity.processDeeplinkData(getIntent());
}
The AndroidManifest file does not seem to merge properly
The "AndroidManifest Merger" that the Airbridge Unity SDK provides is a simple component that merges "Project → Plugins → Android → AndroidManifest.xml" and "Project → Plugins → Airbridge → Android → AndroidManifest.xml". The merge may not satisfy all cases, and you will have to separately merge your "AndroidManifest.xml" file with reference to "Project → Plugins → Airbridge → Android → AndroidManifest.xml".
Missing 'package' key attribute on element package at ...
Due to the addition of Android 11's Package Visibility policy, applications should be properly informed by <queries> inside the manifest file about which packages are used in order to properly interact with another applications.
The Airbridge SDK is compliant with the policy and requires Gradle v5.6.4+ and Android Gradle Plugin v3.6.0+ to support the <queries> tag.
Please refer to this page for information on which version of Gradle is used by Unity.
- Unity 2020.1 or later
2020.1 or laterNo further action is required because the necessary Gradle and Android Gradle plugin exists.
- Unity 2019.3 to 2019.4
2019.3 to 2019.4The following customization is supported only on Unity 2018.4 patch 24 and later.
- Go to the Gradle Build Tool page and download Gradle v5.6.4 or higher
- Go to "Preferences → External Tools" to uncheck "Gradle Installed with Unity (recommended)" and set the path to the downloaded Gradle file as below.

- Go to "Project Settings → Player → Android Tab → Publishing Settings → Build" and select the following options:
a. Custom Main Gradle Template
b. Custom Launcher Gradle Template

- Please change both of the following auto generated files as follows
Assets/Plugins/Android/mainTemplate.gradleAssets/Plugins/Android/launcherTemplate.gradle
buildscript {
    repositories {
        google()
        jcenter()
    }
    dependencies {
        // Must be Android Gradle Plugin 3.6.0 or later. For a list of
        // compatible Gradle versions refer to:
        // https://developer.android.com/studio/releases/gradle-plugin
        classpath 'com.android.tools.build:gradle:3.6.0'
    }
}

allprojects {
   repositories {
      google()
      jcenter()
      flatDir {
        dirs 'libs'
      }
   }
}
- Unity 2019.1 to 2019.2
2019.1 to 2019.2- Go to the Gradle Build Tool page and download Gradle v5.6.4 or higher.
- Go to "Preferences → External Tools" to uncheck "Gradle Installed with Unity (recommended)" and set the path to the downloaded Gradle file as below.

- Go to "Project Settings → Player → Android Tab → Publishing Settings → Build" and select "Custom Gradle Template".

- Go to the auto generated "Assets/Plugins/Android/MainTemplate.gradle" file and make the following changes.
buildscript {
    dependencies {
        // Must be Android Gradle Plugin 3.6.0 or later. For a list of
        // compatible Gradle versions refer to:
        // https://developer.android.com/studio/releases/gradle-plugin
        classpath 'com.android.tools.build:gradle:3.6.0'
    }
}
- Unity 2018.4
2018.4The following customization is supported only on Unity
2018.4 patch 24and later
- Go to the Gradle Build Tool page and download Gradle v5.6.4 or higher.
- Go to "Build Settings → Android" and set "Build System" to "Gradle" to use a custom version of Gradle.

- Go to "Preferences → External Tools", uncheck "Gradle Installed with Unity (recommended)" and set the path to the downloaded "Gradle" file.

- Go to "Project Settings → Player → Android Tab → Publishing Settings → Build" and select the "Custom Gradle Template" option.

- Go to the auto generated "Assets/Plugins/Android/MainTemplate.gradle" file and make the following changes.
buildscript {
    dependencies {
        // Must be Android Gradle Plugin 3.6.0 or later. For a list of
        // compatible Gradle versions refer to:
        // https://developer.android.com/studio/releases/gradle-plugin
        classpath 'com.android.tools.build:gradle:3.6.0'
    }
}
- Unity 2018.3 or earlier
2018.3 or earlierGradle customizations are not supported on these versions of Unity and are not compatible with the necessary changes to support Android 11 (API level 30).
iOS
Using your own custom AppController
Airbridge Unity SDK uses IMPL_APP_CONTROLLER_SUBCLASS to create a custom AppController. If you are using your own custom AppController, please add the following code inside your custom AppController
- (BOOL) application:(UIApplication*)application
continueUserActivity:(NSUserActivity*)userActivity
  restorationHandler:(void (^)(NSArray\<id\<UIUserActivityRestoring>>* _Nullable))restorationHandler
{
    [AUAppDelegate.instance application:application
                   continueUserActivity:userActivity
                     restorationHandler:restorationHandler];

    return YES;
}- Please remove the "Assets → Plugins → Airbridge → iOS → Delegate → AUAppController.mm" file once the above change has been made.
Updated about 1 year ago