Android SDK
SDK 설치
패키지 설치
Gradle 설치
project/build.gradle 파일의 allprojects/repositories 블럭 안에 다음과 같은 라인을 추가해 주세요.
allprojects {
    ...
    repositories {
        ...
        maven { url "https://sdk-download.airbridge.io/maven" }
        ...
    }
    ...
}
Android Studio Arctic Fox(2020.3.1) 이후 버전을 사용하여 프로젝트를 생성하거나, Repository setting을 settings.gradle 파일 내에서 진행하는 경우 project/settings.gradle 파일의 dependencyResolutionManagement/repositories 블럭 안에 다음과 같은 라인을 추가해 주세요.
dependencyResolutionManagement {
	...
	repositories {
		...
		maven { url "https://sdk-download.airbridge.io/maven" }
		...
	}
	...
}
app/build.gradle 파일의 dependencies 블럭 안에 다음과 같은 라인을 추가해 주세요.
dependencies {
    ...
    implementation "io.airbridge:sdk-android:2.+"
    ...
}
직접 설치
에어브릿지 SDK에서는 더 나은 안정성과 생산성을 위해 JetBrains의 Kotlin과 Coroutines 라이브러리를 함께 사용하고 있습니다.
.aar을 통한 직접 설치 시 아래의 링크를 통해 dependency 라이브러리를 함께 프로젝트에 포함시켜 주세요.
에어브릿지 안드로이드 SDK는 Kotlin stdlib 및 Kotlinx coroutines 라이브러리 버전 1.4 이상을 필요로 합니다.
프로젝트 설정
권한 추가
AndroidManifest.xml 파일에 아래와 같이 권한을 추가해 주시기 바랍니다.
<manifest ...>
  ...
  <uses-permission android:name="android.permission.INTERNET" />
  <uses-permission android:name="android.permission.ACCESS_NETWORK_STATE" />
  ...
</manifest>
초기화
AndroidManifest.xml에서 등록한 Application 클래스 파일에 다음과 같은 코드를 추가해 주세요.
@Override
public void onCreate() {
    super.onCreate();
    AirbridgeConfig config = new AirbridgeConfig.Builder("YOUR_APP_NAME", "YOUR_APP_SDK_TOKEN")
        .build();
    Airbridge.init(this, config);
}
override fun onCreate() {
super.onCreate()
val config = AirbridgeConfig.Builder("YOUR_APP_NAME", "YOUR_APP_SDK_TOKEN")
.build()
Airbridge.init(this, config)
}올바른 동작을 위하여 반드시
Application클래스의onCreate시점에init함수가 호출 될 수 있도록 작성해 주세요.
해당 YOUR_APP_NAME과 YOUR_APP_SDK_TOKEN은 Airbridge 대시보드 → Settings → Tokens 탭에서 확인하실 수 있습니다.
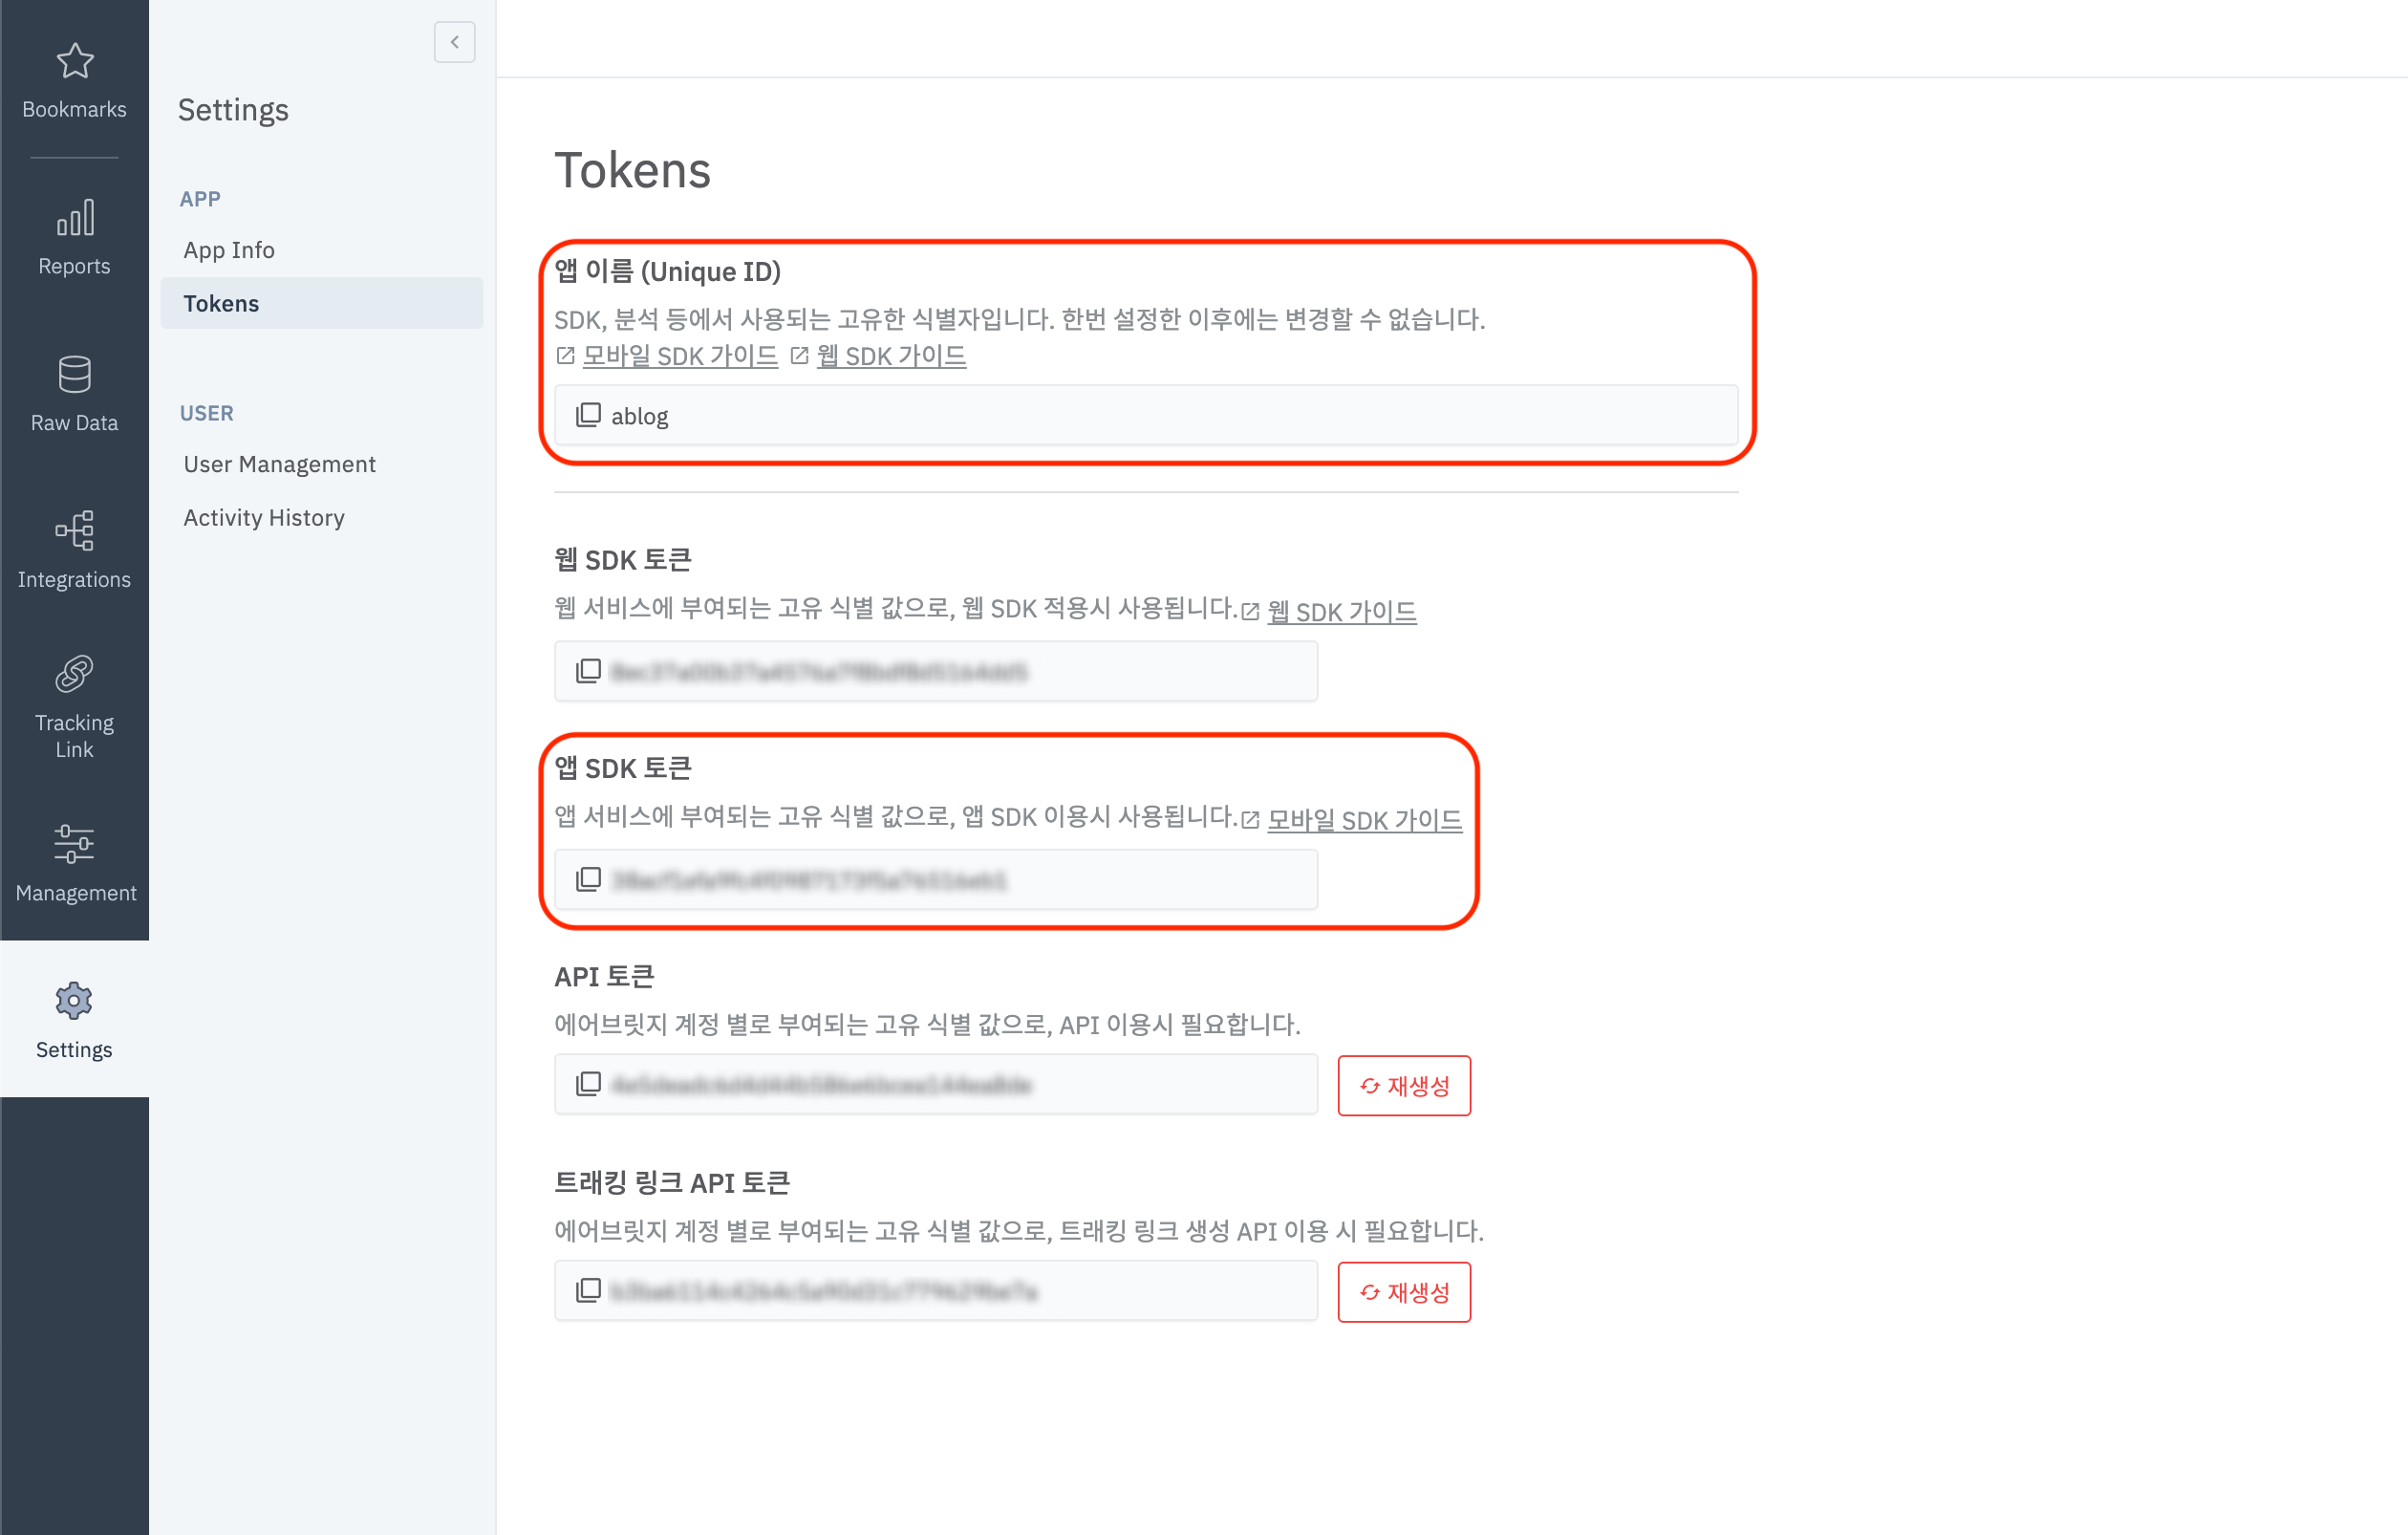
SDK 설치 확인
에어브릿지 SDK의 기본 설치 및 설정이 완료 후 다음과 같은 방법들을 통해서 올바르게 설정 되었는지 확인하실 수 있습니다.
로그캣(LogCat) 확인
해당 앱의 자세한 로그 정보를 로그캣(LogCat)에서 확인하고 싶으신 경우 다음과 같은 방법을 통하여 확인하실 수 있습니다.
해당 사용자의 정보가 노출될 수 있기 때문에 해당 옵션은
Build.DEBUG인 경우에만 동작 할 수 있도록 처리해 주세요.
// Default log level = Log.INFO
AirbridgeConfig config = new AirbridgeConfig.Builder("YOUR_APP_NAME", "YOUR_APP_SDK_TOKEN")
    .setLogLevel(Log.DEBUG)
    .build();
Airbridge.init(this, config);
// Default log level = Log.INFO
val config = AirbridgeConfig.Builder("YOUR_APP_NAME", "YOUR_APP_SDK_TOKEN")
.setLogLevel(Log.DEBUG)
.build()
Airbridge.init(this, config)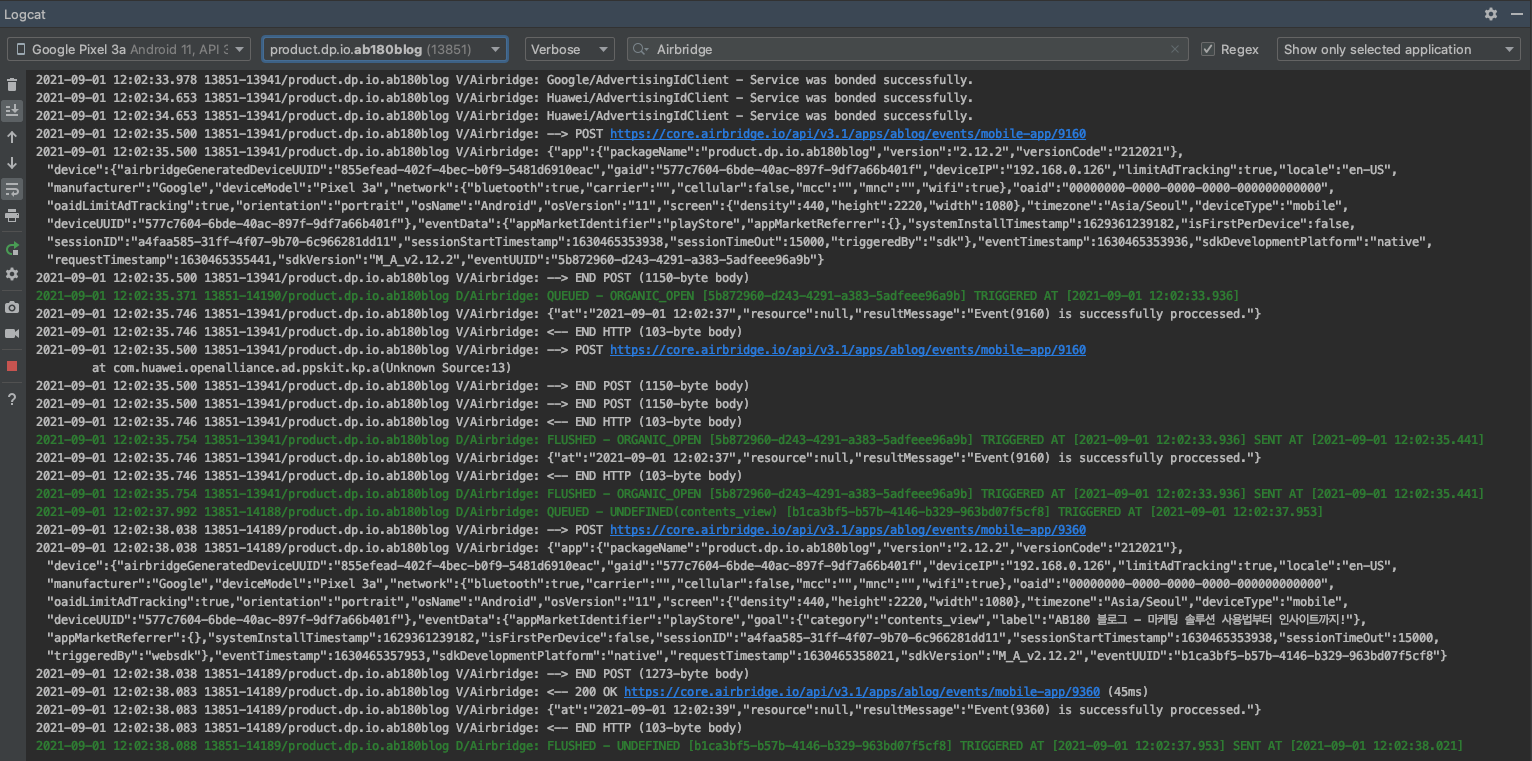
대시보드에서 확인
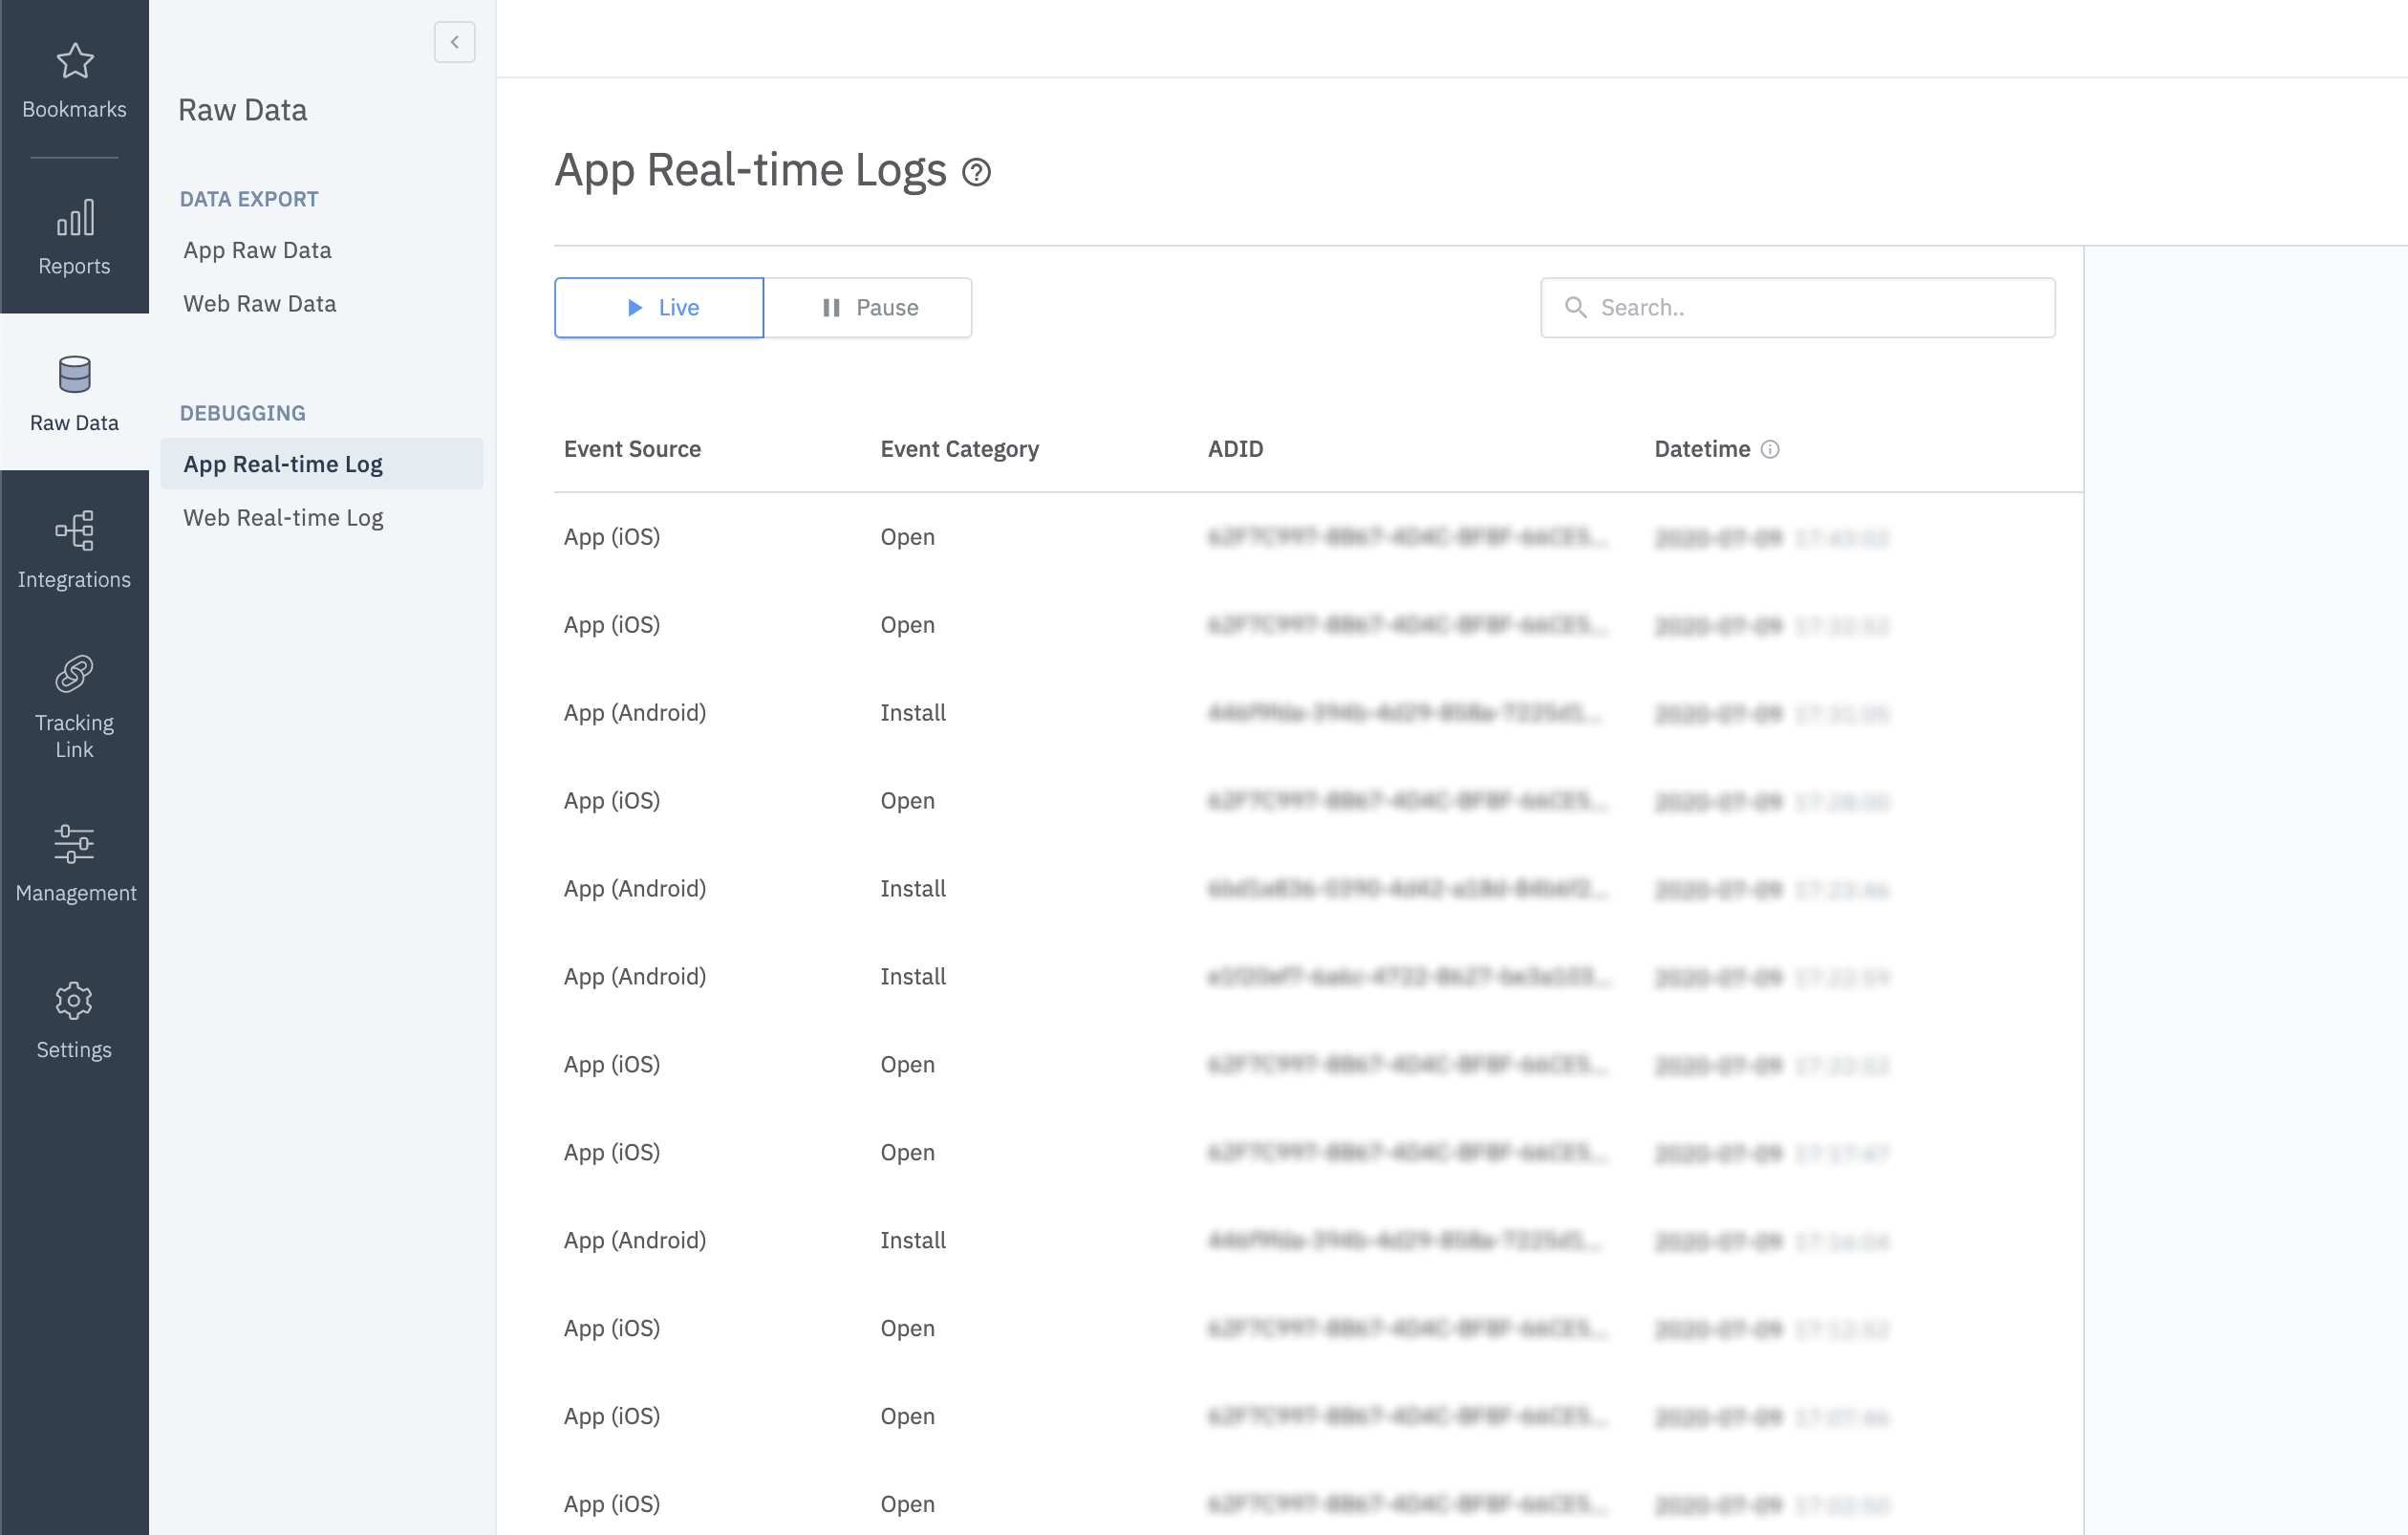
- 해당 테스트를 원하는 디바이스에 앱을 설치하여 실행해 주세요.
- Airbridge 대시보드 →
Raw Data→App Real-time Logs로 들어가주세요. - 검색창에 해당 기기의 Google Advertising ID를 입력해 주세요.
검색창에 입력한 Google Advertising ID를 가진 Install(Event Category 컬럼)인 이벤트가 확인되지 않는다면 위의 가이드에 안내된 대로 설치되었는지 다시 확인해 주세요.
Android 디바이스에서
설정→Google 설정→광고→내 광고 ID 확인항목에서 해당 기기의 Google Advertising ID를 확인할 수 있습니다.
딥링크 설정
대시보드 설정
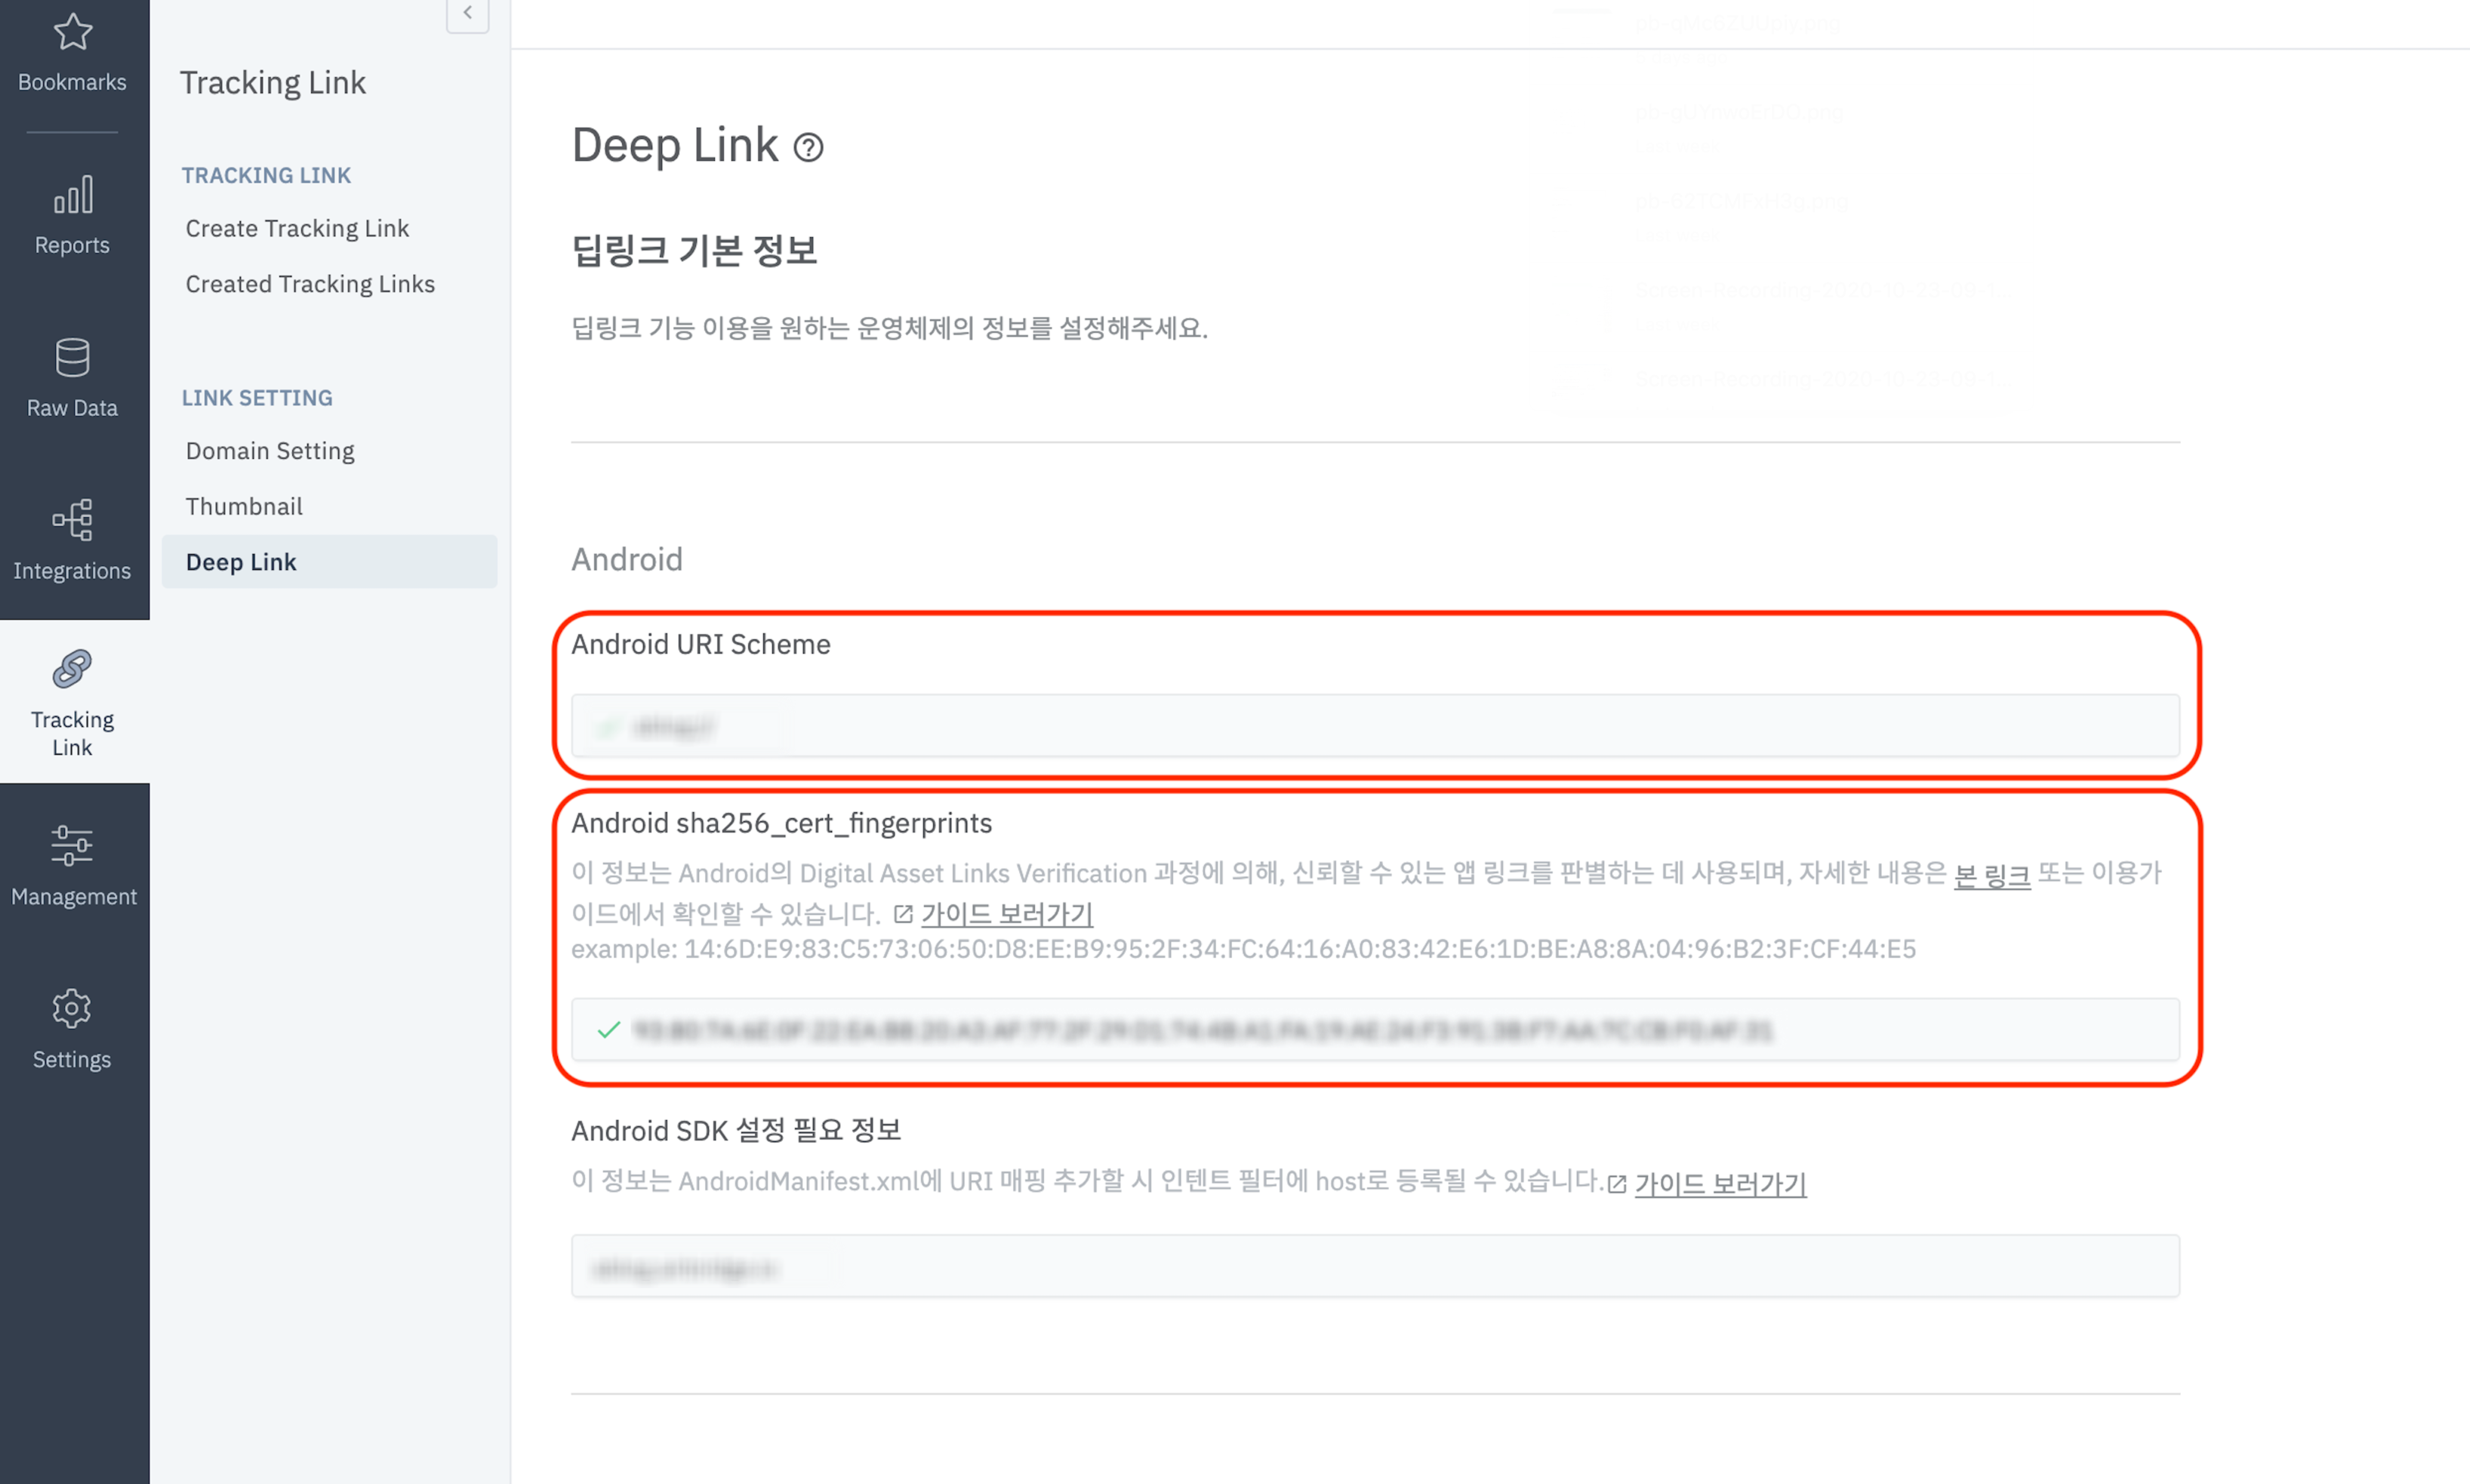
대시보드에 다음과 같은 2가지 정보를 등록해야 합니다.
- URI Scheme
- sha256_cert_fingerprints
Scheme 등록
사용할 URL Scheme을 상단의 사진과 같이 Android URL Scheme 영역에 ://를 포함하여 다음과 같이 입력해 주세요.
example://
에어브릿지의 URI Scheme은 영어 소문자, 숫자 그리고 일부 특수문자(-+.)만 지원하고 있습니다.
Fingerprint 등록
sha256_cert_fingerprints를 취득하는 방법은 아래와 같습니다.
- Google Play Store에 앱을 등록할 때 사용한
keystore파일을 준비해 주세요. - 다음 명령을
Terminal에서 실행해 주세요.
keytool -list -v -keystore my-release-key.keystore- 하단과 같이
Certificate fingerprints영역의SHA256값을 복사해, 상단의 사진과 같이Android sha256_cert_fingerprints영역에 입력해 주세요.
Certificate fingerprints:
    MD5:  4C:65:04:52:F0:3F:F8:65:08:D3:71:86:FC:EF:C3:49
    SHA1: C8:BF:B7:B8:94:EA:5D:9D:38:59:FE:99:63:ED:47:B2:D9:5A:4E:CC
SHA256: B5:EF:4D:F9:DC:95:E6:9B:F3:9A:5E:E9:D6:E0:D8:F6:7B:AB:79:C8:78:67:34:D9:A7:01:AB:6A:86:01:0E:99Android sha256_cert_fingerprints는 쉼표(’,’)로 구분해서 여러 값을 등록할 수 있습니다.
프로젝트 설정
Intent Filter 설정
airbridge android SDK v2.21.1 이상 버전을 사용중이라면 하단에 명시된 절차에 따라서 Intent Filter를 설정해 주세요. airbridge android SDK v2.21.0 이하 버전을 사용중이라면 바로가기 에 설정된 절차를 따라서 설정해 주세요.
AndroidManifest.xml파일을 열어주세요.- 딥링크를 처리할
Acitivty에Intent Filter를 다음과 같이 추가해 주세요.
<activity ...>
    ...
    <intent-filter android:autoVerify="true">
        <action android:name="android.intent.action.VIEW" />

        <category android:name="android.intent.category.DEFAULT" />
        <category android:name="android.intent.category.BROWSABLE" />

        <data android:scheme="http" android:host="YOUR_APP_NAME.abr.ge" />
        <data android:scheme="https" android:host="YOUR_APP_NAME.abr.ge" />
    </intent-filter>
    <intent-filter android:autoVerify="true">
        <action android:name="android.intent.action.VIEW" />

        <category android:name="android.intent.category.DEFAULT" />
        <category android:name="android.intent.category.BROWSABLE" />

        <data android:scheme="http" android:host="YOUR_APP_NAME.airbridge.io" />
        <data android:scheme="https" android:host="YOUR_APP_NAME.airbridge.io" />
    </intent-filter>
    <intent-filter>
        <action android:name="android.intent.action.VIEW" />

        <category android:name="android.intent.category.DEFAULT" />
        <category android:name="android.intent.category.BROWSABLE" />

        <data android:scheme="YOUR_APP_URI_SCHEME" />
    </intent-filter>
    ...
</activity>YOUR_APP_NAME.abr.ge: Airbridge App Links 버전 2YOUR_APP_NAME.airbridge.io: Airbridge App Links 버전 1YOUR_APP_URI_SCHEME: URI Scheme 방식의 딥링크
커스텀 도메인 설정
Airbridge 대시보드에서 트래킹 링크를 생성하게 되는 경우 abr.ge 형태의 트래킹 링크를 사용할 수 있지만, 고객사에서는 트래킹 링크의 브랜딩 및 클릭률(CTR)의 향상을 위해 다음과 같은 설정을 통해 go.my_company.com/abcd와 같이 커스터마이즈 된 URL을 트래킹 링크로 사용할 수 있습니다.
- 사용할 커스텀 도메인을 다음 가이드와 같이 설정해 주세요.
- 앞서 설정한 커스텀 도메인 주소를
res/values/airbridge.xml파일을 생성해 다음과 같이 추가해 주세요.
<?xml version="1.0" encoding="utf-8"?>
<resources xmlns:tools="http://schemas.android.com/tools">
    <string-array name="co_ab180_airbridge_custom_domains">
        <item>YOUR_CUSTOM_DOMAIN</item>
    </string-array>
</resources>- 앞서 설정한
Intent Filter와 같이 딥링크를 처리할Acitivty의Intent Filter를 다음과 같이 추가해 주세요.
<activity ...>
    ...
    <intent-filter android:autoVerify="true">
        <action android:name="android.intent.action.VIEW" />

        <category android:name="android.intent.category.DEFAULT" />
        <category android:name="android.intent.category.BROWSABLE" />

        <data android:scheme="http" android:host="YOUR_CUSTOM_DOMAIN" />
        <data android:scheme="https" android:host="YOUR_CUSTOM_DOMAIN" />
    </intent-filter>
    ...
</activity>상단에 추가된
YOUR_CUSTOM_DOMAIN은 Airbridge 대시보드에 기입된 정보와 일치해야 합니다.
딥링크 콜백 설정
앞서 설정한 Activity에서 추가된 Intent Filter의 딥링크를 처리하기 위해서 다음과 같은 작업이 필요합니다.
@Override
protected void onResume() {
    super.onResume();
    Airbridge.getDeeplink(getIntent(), new AirbridgeCallback<Uri>() {
        @Override
        public void onSuccess(Uri uri) {
            // Process deeplink data
        }

        @Override
        public void onFailure(Throwable throwable) {
            // Error
        }

        @Override
        public void onComplete() {
            // After process deeplink data
        }
    });
}

// The code below is required for proper deeplink processing
@Override
protected void onNewIntent(Intent intent) {
    super.onNewIntent(intent);
    setIntent(intent);
}
override fun onResume() {
super.onResume()
Airbridge.getDeeplink(intent, object : AirbridgeCallback<Uri> {
override fun onSuccess(uri: Uri) {
// Process deeplink data
}
override fun onFailure(throwable: Throwable) {
// Error
}
override fun onComplete() {
// After process deeplink data
}
})
}
// The code below is required for proper deeplink processing
override fun onNewIntent(intent: Intent?) {
super.onNewIntent(intent)
setIntent(intent)
}디퍼드 딥링크 설정
에어브릿지 SDK에서 디퍼드 딥링크가 발생하는 일반적인 경우 AndroidManiest.xml에 설정된 Intent Filter에 따라 자동으로 해당 Activity가 호출되며 앞서 설명한 딥링크 콜백 설정과 동일한 방법을 통해 일괄적으로 처리할 수 있습니다.
디퍼드 딥링크를 통해 얻어진 정보를 이용하여 특수한 작업을 처리하거나 혹은 디퍼드 딥링크를 통해 자동으로 Activity가 호출되는 것을 원치 않는 경우 다음과 같은 방법을 통하여 설정이 가능합니다.
AirbridgeConfig config = new AirbridgeConfig.Builder("YOUR_APP_NAME", "YOUR_APP_SDK_TOKEN")
    .setOnDeferredDeeplinkReceiveListener(new OnDeferredDeeplinkReceiveListener() {
        @Override
        public boolean shouldLaunchReceivedDeferredDeeplink(Uri uri) {
            // If you want to open the target activity, please return true otherwise false
            // Default returning value = true
            return true;
        }
    })
    .build();
Airbridge.init(this, config);
val config = AirbridgeConfig.Builder("YOUR_APP_NAME", "YOUR_APP_SDK_TOKEN")
.setOnDeferredDeeplinkReceiveListener(object : OnDeferredDeeplinkReceiveListener {
override fun shouldLaunchReceivedDeferredDeeplink(uri: Uri): Boolean {
// If you want to open the target activity, please return true otherwise false
// Default returning value = true
return true
}
})
.build()
Airbridge.init(this, config)딥링크 설정 확인
에어브릿지 SDK의 딥링크 설정을 완료 후 다음과 같은 링크들을 통하여 해당 모바일 앱의 페이지로 올바르게 이동 되는지 확인하실 수 있습니다.
YOUR_APP_URI_SCHEME://
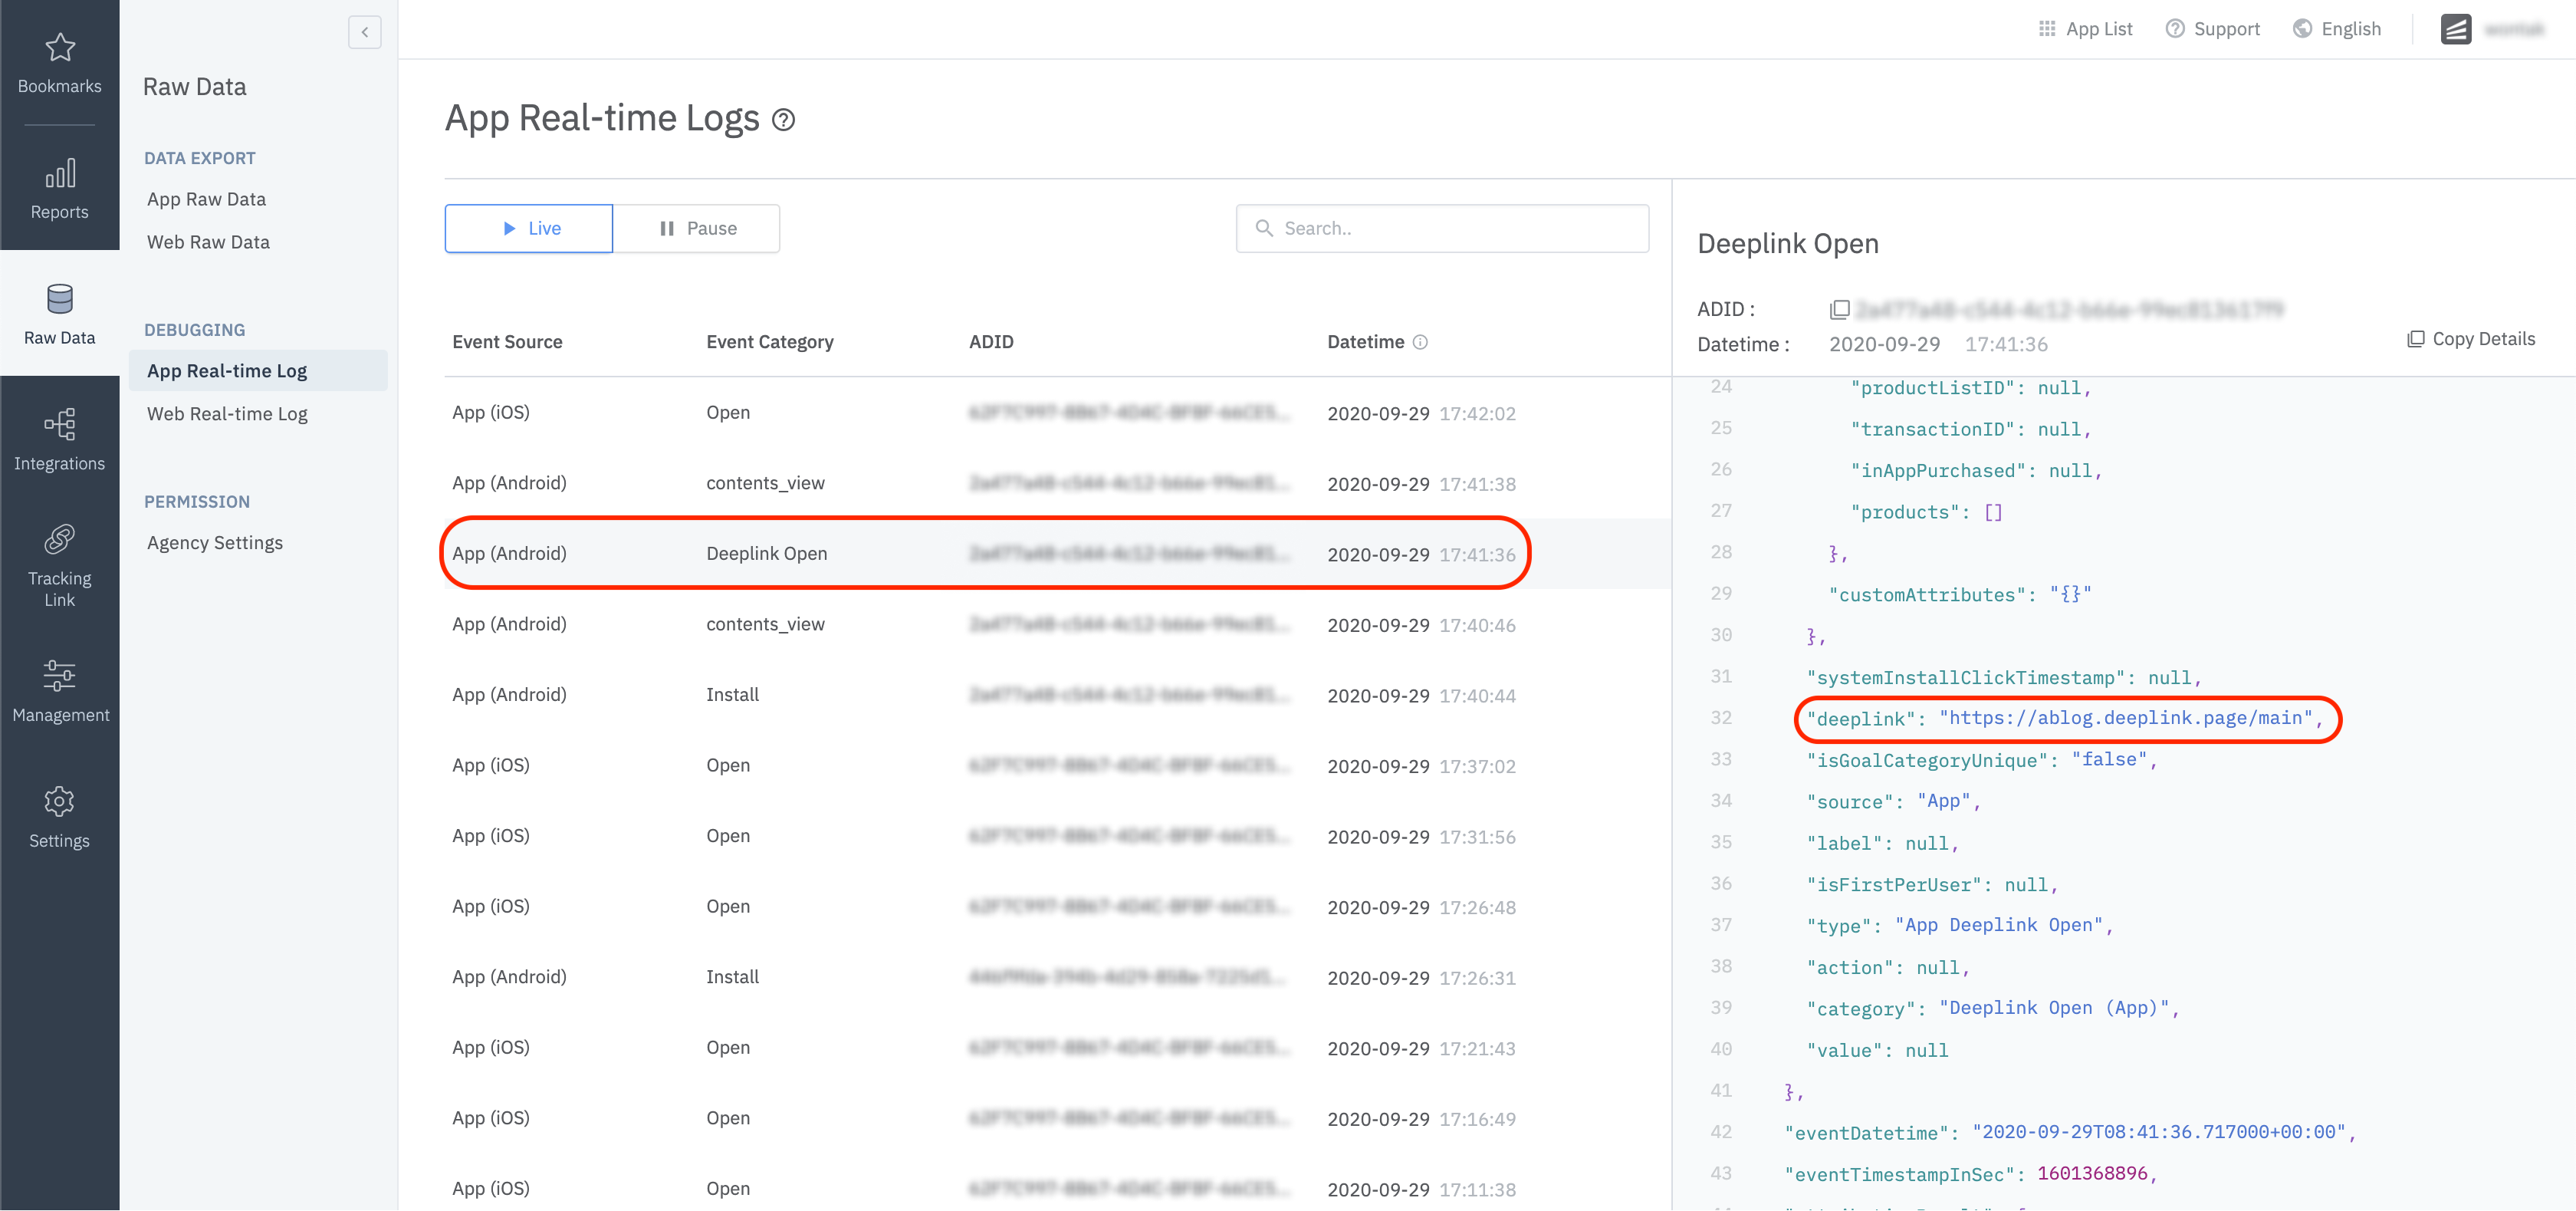
딥링크 설정 및 확인이 완료되면 Airbridge 대시보드 > Raw Data > App Real-time Log 탭에서 다음과 같이 확인하실 수 있습니다.
사용자 설정
사용자 식별자 설정
Airbridge에서는 웹(Web)과 앱(App)간의 파편화된 사용자의 기여도 측정을 위해 다음과 같은 사용자의 식별자 정보들을 수집합니다.
- User Email : 이메일
- User Phone : 전화번호
- User ID : 사용자 고유 ID (사용자의 특정할 수 있는 ID 값으로 웹과 앱에서 1:1로 대응되어야 합니다)
- User Alias : 사용자를 나타낼 수 있는 기타 ID (e.g. 로열티 프로그램용 ID, 계열사 통합 ID 등등)
입력되어진 사용자의 이메일과 전화번호는 자동으로 해시화(SHA256)되어 서버로 전송되어 집니다.
에어브릿지 SDK에서는 다음과 같은 방법을 통해 사용자의 식별자 정보를 설정할 수 있습니다.
// Automatically hashed on client side using SHA256
// Can turn off hashing feature with special flag
Airbridge.getCurrentUser().setEmail("[email protected]");
Airbridge.getCurrentUser().setPhone("821012341234");

// Does not hash
Airbridge.getCurrentUser().setId("testID");
Airbridge.getCurrentUser().setAlias("key", "value");

// Clear user data
Airbridge.expireUser()
// Automatically hashed on client side using SHA256
// Can turn off hashing feature with special flag
Airbridge.getCurrentUser().email = "[email protected]"
Airbridge.getCurrentUser().phone = "821012341234"
// Does not hash
Airbridge.getCurrentUser().id = "testID"
Airbridge.getCurrentUser().setAlias("key", "value")
// Clear user data
Airbridge.expireUser()
- User Alias의 개수는
최대 10개입니다.- User Alias의 key 는
String 타입이며, 길이는최대 128자입니다.- User Alias의 key 는
^[a-zA-Z_][a-zA-Z0-9_]*$ 정규식을 만족해야 합니다.- User Alias의 value 는
String 타입이며 String의 경우최대 128자입니다.
사용자의 식별자 정보를 한번 설정하게 되면 다음 모든 이벤트에 해당 식별자 정보가 함께 포함되어 전달됩니다.
사용자 속성 설정
MTA(Multi-Touch Attribution) 분석의 정확도 향상, 내부 데이터 분석, 서드파티(3rd Party) 솔루션 연동 등의 목적으로 사용자의 추가 속성 데이터를 설정할 수 있습니다.
Airbridge.getCurrentUser().setAttribute("key", "value");Airbridge.getCurrentUser().setAttribute("key", "value")
- User Attribute의 개수는
최대 100개입니다.- User Attribute의 key 는
String 타입이며, 길이는최대 128자입니다.- User Attribute의 key 는
^[a-zA-Z_][a-zA-Z0-9_]*$ 정규식을 만족해야 합니다.- User Attribute의 value 는
Integer, Float, Long, Boolean 타입과String 타입이며 String의 경우최대 1024자입니다.
사용자 설정 확인
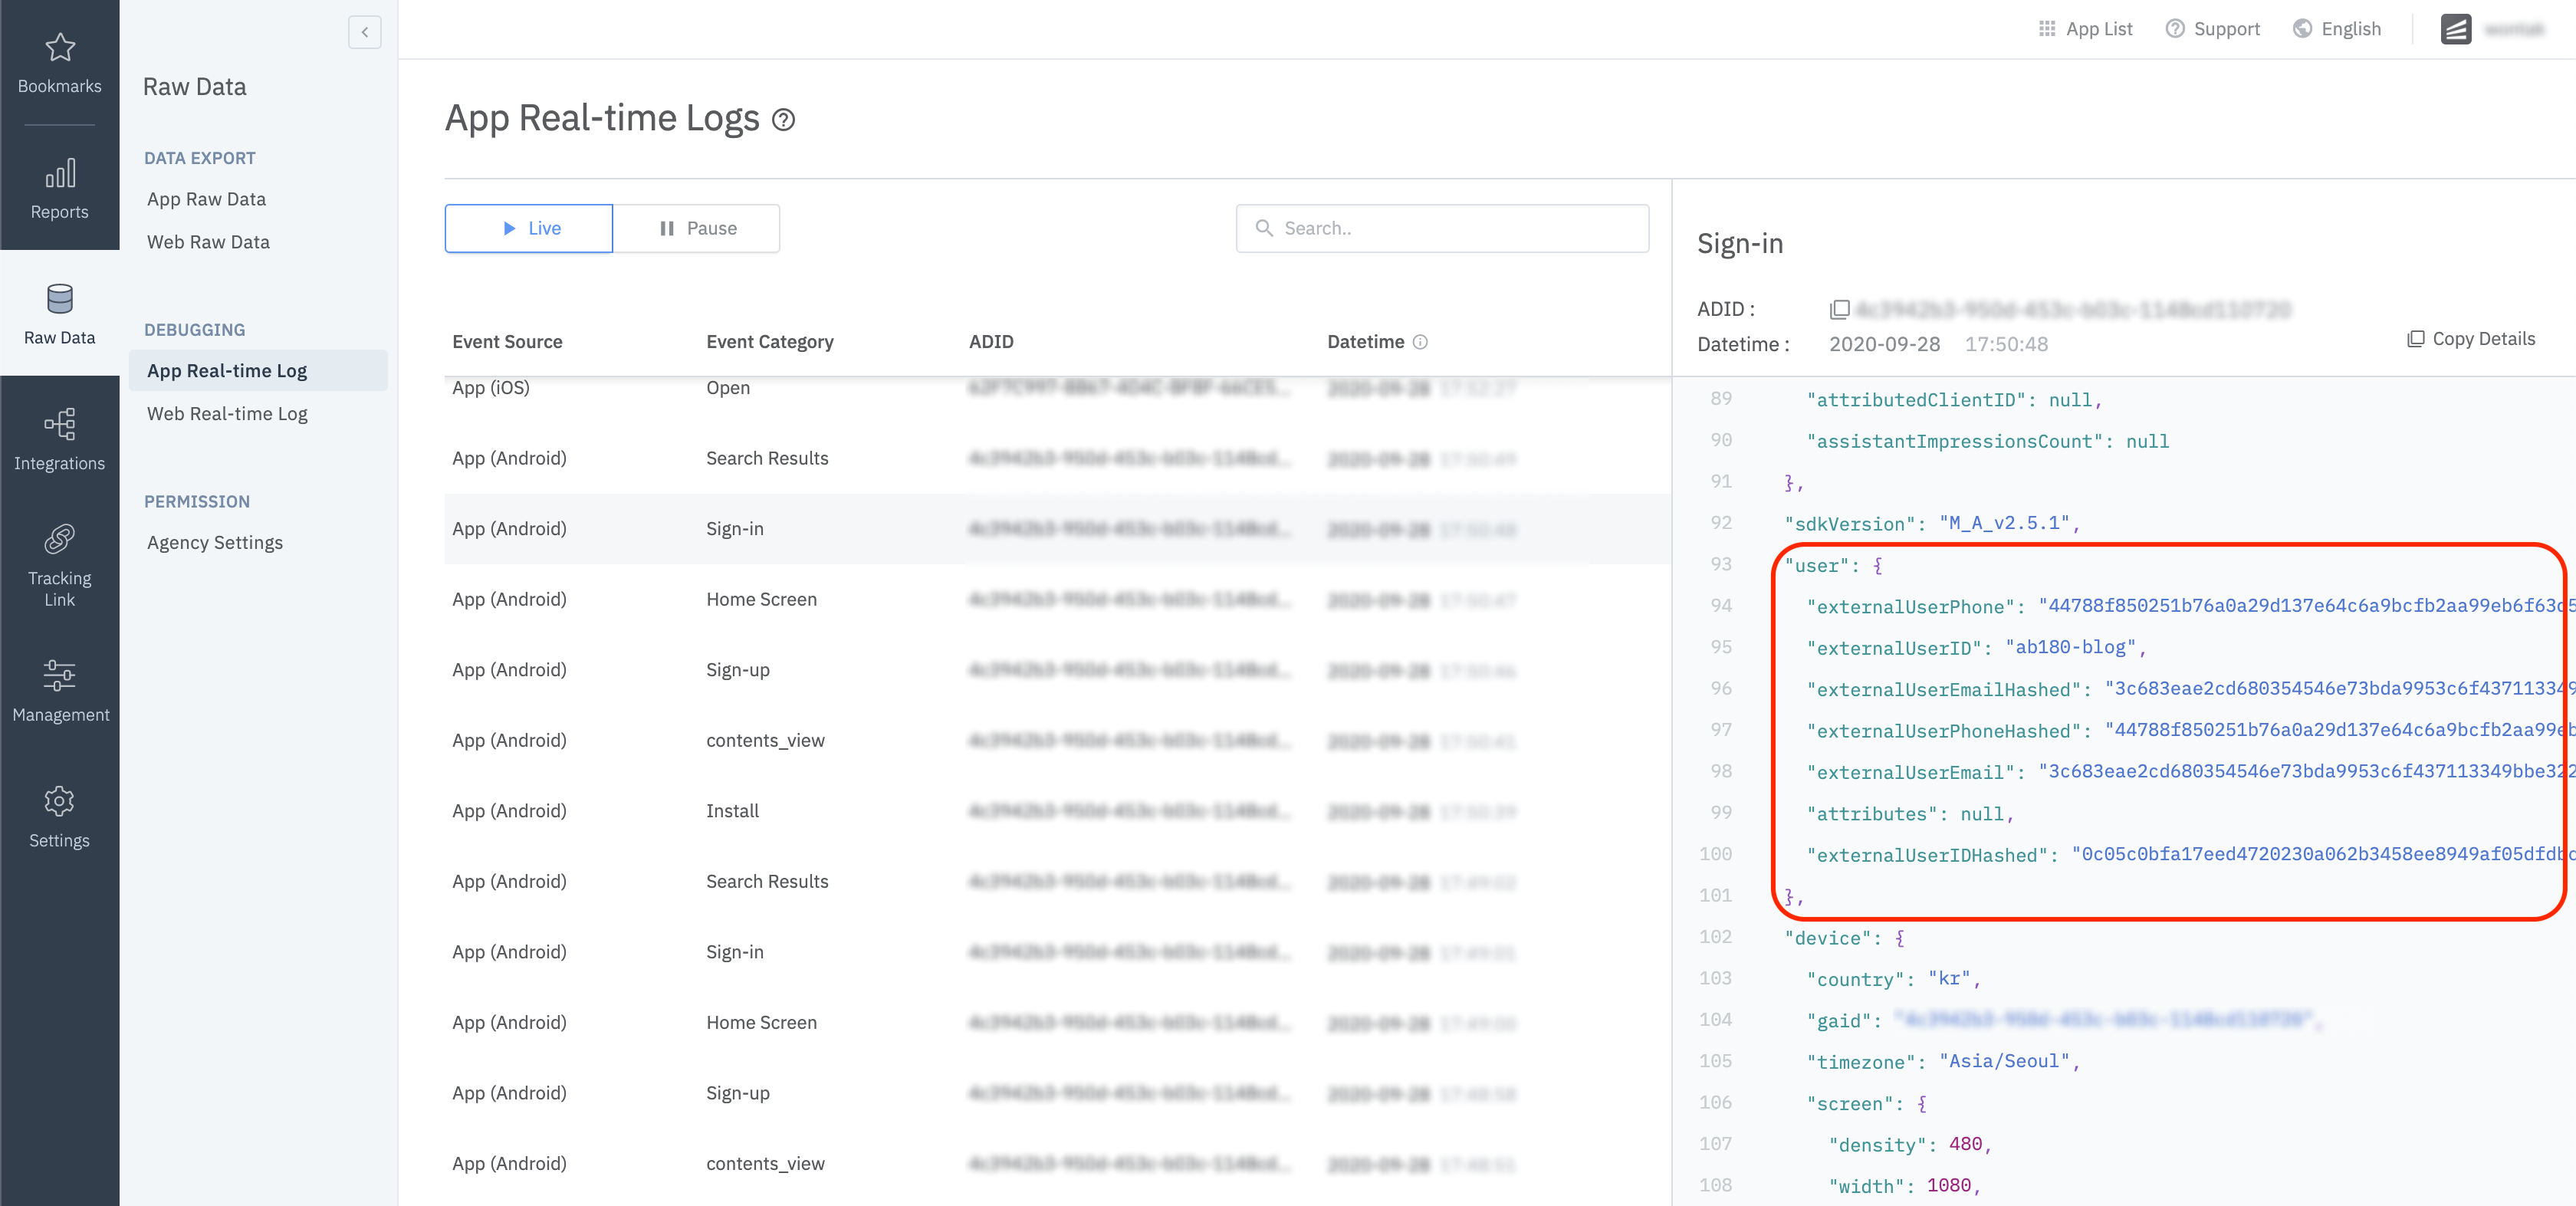
에어브릿지 SDK에서 설정한 유저 정보는 Airbridge 대시보드 → Raw Data → App Real-time Log 탭에서 다음과 같이 확인하실 수 있습니다.
디바이스 설정
디바이스 식별자 설정
SDK에 디바이스 식별자 정보를 설정해 이후 수집되는 모든 이벤트에 디바이스 식별정보를 포함시킬 수 있습니다. 디바이스 식별자가 설정되면 별도로 삭제하지 않을 경우 앱 종료 여부에 관계없이 계속 유지됩니다.
Airbridge.setDeviceAlias("ADD_YOUR_KEY", "AND_YOUR_VALUE");
Airbridge.removeDeviceAlias("DELETE_THIS_KEY");
Airbridge.clearDeviceAlias();
Airbridge.setDeviceAlias("ADD_YOUR_KEY", "AND_YOUR_VALUE")
Airbridge.removeDeviceAlias("DELETE_THIS_KEY")
Airbridge.clearDeviceAlias()| 메소드 | 설명 |
|---|---|
| setDeviceAlias(key: String, value: String) | 전달한 Key와 Value 쌍을 디바이스 식별자에 추가합니다. |
| removeDeviceAlias(key: String) | 전달한 Key에 해당하는 디바이스 식별자를 삭제합니다. 해당하는 식별자가 없을 경우 아무런 동작을 하지 않습니다. |
| clearDeviceAlias() | 모든 디바이스 식별자를 삭제합니다. |
이벤트 설정
에어브릿지 SDK에서 호출하는 모든 이벤트들은 다음과 같이 6개의 하위 속성 값들과 함께 전송할 수 있습니다.
- Event Category : 이벤트의 이름
Required(String) - Event Action : 이벤트 하위 속성값 1 (String)
- Event Label : 이벤트 하위 속성값 2 (String)
- Event Value : 이벤트 하위 속성값 3 (Number)
- Event Custom Attributes : 이벤트 하위의 커스텀 데이터 (Map<String, Object>)
- Event Semantic Attributes : 이벤트 하위의 시멘틱 데이터 (Map<String, Object>)
이벤트 전송
에어브릿지 SDK에서는 다음과 같은 방법을 통해 이벤트를 전송할 수 있습니다.
Number eventValue = 10;
Map<String, Object> eventAttributes = new HashMap<String, Object>();
SemanticAttributes semanticAttributes = new SemanticAttributes();
semanticAttributes.put(SemanticAttributes.KEY_CURRENCY, "KRW");
Airbridge.trackEvent(StandardEventCategory.HOME_VIEW, "event_action", "event_label", eventValue, eventAttributes, semanticAttributes);
val eventValue = 10
val eventAttributes = mutableMapOf<String, Any?>()
val semanticAttributes = SemanticAttributes()
semanticAttributes[SemanticAttributes.KEY_CURRENCY] = "KRW"
Airbridge.trackEvent(StandardEventCategory.HOME_VIEW, "event_action", "event_label", eventValue, eventAttributes, semanticAttributes)제공되는 카테고리 유형으로 해결되지 않는 특정한 요구사항이 존재하는 경우 다음과 같은 방법을 통하여 맞춤 이벤트를 직접 전송할 수 있습니다.
Number eventValue = 10;
Map<String, Object> eventAttributes = new HashMap<String, Object>();
SemanticAttributes semanticAttributes = new SemanticAttributes();
semanticAttributes.put(SemanticAttributes.KEY_CURRENCY, "KRW");
Airbridge.trackEvent("event_category", "event_action", "event_label", eventValue, eventAttributes, semanticAttributes);
val eventValue = 10
val eventAttributes = mutableMapOf<String, Any?>()
val semanticAttributes = SemanticAttributes()
semanticAttributes[SemanticAttributes.KEY_CURRENCY] = "KRW"
Airbridge.trackEvent("event_category", "event_action", "event_label", eventValue, eventAttributes, semanticAttributes)에어브릿지 SDK에서 지원되는
Semantic Attirbutes에 대한 자세한 사항은 해당 페이지에서 확인 가능합니다.
또한 다음과 같은 방법을 통하여 각 앱에 맞는 이벤트를 미리 정의된 클래스 형태로 사용할 수 있습니다.
class MyAppEvent extends Event {
    public MyAppEvent() {
        super("my_custom_category");
    }
}
...
Airbridge.trackEvent(new MyAppEvent());
...
class MyAppEvent : Event("my_custom_category")
...
Airbridge.trackEvent(MyAppEvent())
...스탠다드 이벤트 전송
회원가입 이벤트
Airbridge.getCurrentUser().setEmail("[email protected]");
Airbridge.getCurrentUser().setPhone("821012341234");
Airbridge.getCurrentUser().setId("12345");
Airbridge.getCurrentUser().setAlias("alias1", "value");
Airbridge.getCurrentUser().setAttributes("attr1", 1234);
Airbridge.trackEvent(StandardEventCategory.SIGN_UP);
Airbridge.getCurrentUser().email = "[email protected]"
Airbridge.getCurrentUser().phone = "821012341234"
Airbridge.getCurrentUser().id = "testID"
Airbridge.getCurrentUser().setAlias("alias1", "value")
Airbridge.getCurrentUser().setAttribute("attr1", 1234)
Airbridge.trackEvent(StandardEventCategory.SIGN_UP)로그인 이벤트
Airbridge.getCurrentUser().setEmail("[email protected]");
Airbridge.getCurrentUser().setPhone("821012341234");
Airbridge.getCurrentUser().setId("12345");
Airbridge.getCurrentUser().setAlias("alias1", "value");
Airbridge.getCurrentUser().setAttributes("attr1", 1234);
Airbridge.trackEvent(StandardEventCategory.SIGN_IN);
Airbridge.getCurrentUser().email = "[email protected]"
Airbridge.getCurrentUser().phone = "821012341234"
Airbridge.getCurrentUser().id = "testID"
Airbridge.getCurrentUser().setAlias("alias1", "value")
Airbridge.getCurrentUser().setAttribute("attr1", 1234)
Airbridge.trackEvent(StandardEventCategory.SIGN_IN)로그아웃 이벤트
Airbridge.trackEvent(StandardEventCategory.SIGN_OUT);
Airbridge.expireUser();
Airbridge.trackEvent(StandardEventCategory.SIGN_OUT)
Airbridge.expireUser()메인 화면 조회
Airbridge.trackEvent(StandardEventCategory.HOME_VIEW);Airbridge.trackEvent(StandardEventCategory.HOME_VIEW)검색 결과 조회
SemanticAttributes semanticAttributes = new SemanticAttributes();
semanticAttributes.setQuery("Coca Cola");
Airbridge.trackEvent(StandardEventCategory.SEARCH_RESULT_VIEW, null, null, null, null, semanticAttributes);
val semanticAttributes = SemanticAttributes()
semanticAttributes.query = "Coca Cola"
Airbridge.trackEvent(StandardEventCategory.SEARCH_RESULT_VIEW, null, null, null, null, semanticAttributes)상품 리스트 조회
Product fanta = new Product();
fanta.setId("fanta_orange");
fanta.setName("FANTA Orange");
fanta.setQuantity(1);
fanta.setCurrency("usd");
fanta.setPrice(1.99);
fanta.setPosition(0);

Product cocacola = new Product();
cocacola.setId("cocacola_low_sugar");
cocacola.setName("Cocacola Low Sugar");
cocacola.setQuantity(1);
cocacola.setCurrency("usd");
cocacola.setPrice(2.99);
cocacola.setPosition(1);

SemanticAttributes semanticAttributes = new SemanticAttributes();
semanticAttributes.setProductListId("beverage_1");
semanticAttributes.setProducts(Arrays.asList(fanta, cocacola));
Airbridge.trackEvent(StandardEventCategory.PRODUCT_LIST_VIEW, null, null, null, null, semanticAttributes);
val fanta = Product()
fanta.id = "fanta_orange"
fanta.name = "FANTA Orange"
fanta.quantity = 1
fanta.currency = "usd"
fanta.price = 1.99
fanta.position = 0
val cocacola = Product()
cocacola.id = "cocacola_low_sugar"
cocacola.name = "Cocacola Low Sugar"
cocacola.quantity = 1
cocacola.currency = "usd"
cocacola.price = 2.99
cocacola.position = 1
val semanticAttributes = SemanticAttributes()
semanticAttributes.productListId = "beverage_1"
semanticAttributes.products = listOf(fanta, cocacola)
Airbridge.trackEvent(StandardEventCategory.PRODUCT_LIST_VIEW, null, null, null, null, semanticAttributes)상품 상세 페이지 조회
Product fanta = new Product();
fanta.setId("fanta_orange");
fanta.setName("FANTA Orange");
fanta.setQuantity(1);
fanta.setCurrency("usd");
fanta.setPrice(1.99);
fanta.setPosition(0);

Product cocacola = new Product();
cocacola.setId("cocacola_low_sugar");
cocacola.setName("Cocacola Low Sugar");
cocacola.setQuantity(1);
cocacola.setCurrency("usd");
cocacola.setPrice(2.99);
cocacola.setPosition(1);

SemanticAttributes semanticAttributes = new SemanticAttributes();
semanticAttributes.setProducts(Arrays.asList(fanta, cocacola));
Airbridge.trackEvent(StandardEventCategory.PRODUCT_DETAILS_VIEW, null, null, null, null, semanticAttributes);
val fanta = Product()
fanta.id = "fanta_orange"
fanta.name = "FANTA Orange"
fanta.quantity = 1
fanta.currency = "usd"
fanta.price = 1.99
fanta.position = 0
val cocacola = Product()
cocacola.id = "cocacola_low_sugar"
cocacola.name = "Cocacola Low Sugar"
cocacola.quantity = 1
cocacola.currency = "usd"
cocacola.price = 2.99
cocacola.position = 1
val semanticAttributes = SemanticAttributes()
semanticAttributes.products = listOf(fanta, cocacola)
Airbridge.trackEvent(StandardEventCategory.PRODUCT_DETAILS_VIEW, null, null, null, null, semanticAttributes)장바구니 담기
Product fanta = new Product();
fanta.setId("fanta_orange");
fanta.setName("FANTA Orange");
fanta.setQuantity(1);
fanta.setCurrency("usd");
fanta.setPrice(1.99);
fanta.setPosition(0);

Product cocacola = new Product();
cocacola.setId("cocacola_low_sugar");
cocacola.setName("Cocacola Low Sugar");
cocacola.setQuantity(1);
cocacola.setCurrency("usd");
cocacola.setPrice(2.99);
cocacola.setPosition(1);

SemanticAttributes semanticAttributes = new SemanticAttributes();
semanticAttributes.setCartId("cart_123");
semanticAttributes.setProducts(Arrays.asList(fanta, cocacola));
semanticAttributes.setCurrency("usd");
semanticAttributes.setTotalValue(4.98);
Airbridge.trackEvent(StandardEventCategory.ADD_TO_CART, null, null, null, null, semanticAttributes);
val fanta = Product()
fanta.id = "fanta_orange"
fanta.name = "FANTA Orange"
fanta.quantity = 1
fanta.currency = "usd"
fanta.price = 1.99
fanta.position = 0
val cocacola = Product()
cocacola.id = "cocacola_low_sugar"
cocacola.name = "Cocacola Low Sugar"
cocacola.quantity = 1
cocacola.currency = "usd"
cocacola.price = 2.99
cocacola.position = 1
val semanticAttributes = SemanticAttributes()
semanticAttributes.cartId = "cart_123"
semanticAttributes.products = listOf(fanta, cocacola)
semanticAttributes.currency = "usd"
semanticAttributes.totalValue = 4.98
Airbridge.trackEvent(StandardEventCategory.ADD_TO_CART, null, null, null, null, semanticAttributes)결제 완료
Product fanta = new Product();
fanta.setId("fanta_orange");
fanta.setName("FANTA Orange");
fanta.setQuantity(1);
fanta.setCurrency("usd");
fanta.setPrice(1.99);
fanta.setPosition(0);

Product cocacola = new Product();
cocacola.setId("cocacola_low_sugar");
cocacola.setName("Cocacola Low Sugar");
cocacola.setQuantity(1);
cocacola.setCurrency("usd");
cocacola.setPrice(2.99);
cocacola.setPosition(1);

SemanticAttributes semanticAttributes = new SemanticAttributes();
semanticAttributes.setProducts(Arrays.asList(fanta, cocacola));
semanticAttributes.setCurrency("usd");
semanticAttributes.setTotalValue(4.98);
semanticAttributes.setInAppPurchased(true);
Airbridge.trackEvent(StandardEventCategory.ORDER_COMPLETED, null, null, null, null, semanticAttributes);
val fanta = Product()
fanta.id = "fanta_orange"
fanta.name = "FANTA Orange"
fanta.quantity = 1
fanta.currency = "usd"
fanta.price = 1.99
fanta.position = 0
val cocacola = Product()
cocacola.id = "cocacola_low_sugar"
cocacola.name = "Cocacola Low Sugar"
cocacola.quantity = 1
cocacola.currency = "usd"
cocacola.price = 2.99
cocacola.position = 1
val semanticAttributes = SemanticAttributes()
semanticAttributes.products = listOf(fanta, cocacola)
semanticAttributes.currency = "usd"
semanticAttributes.totalValue = 4.98
semanticAttributes.inAppPurchased = true
Airbridge.trackEvent(StandardEventCategory.ORDER_COMPLETED, null, null, null, null, semanticAttributes)이벤트 전송 확인
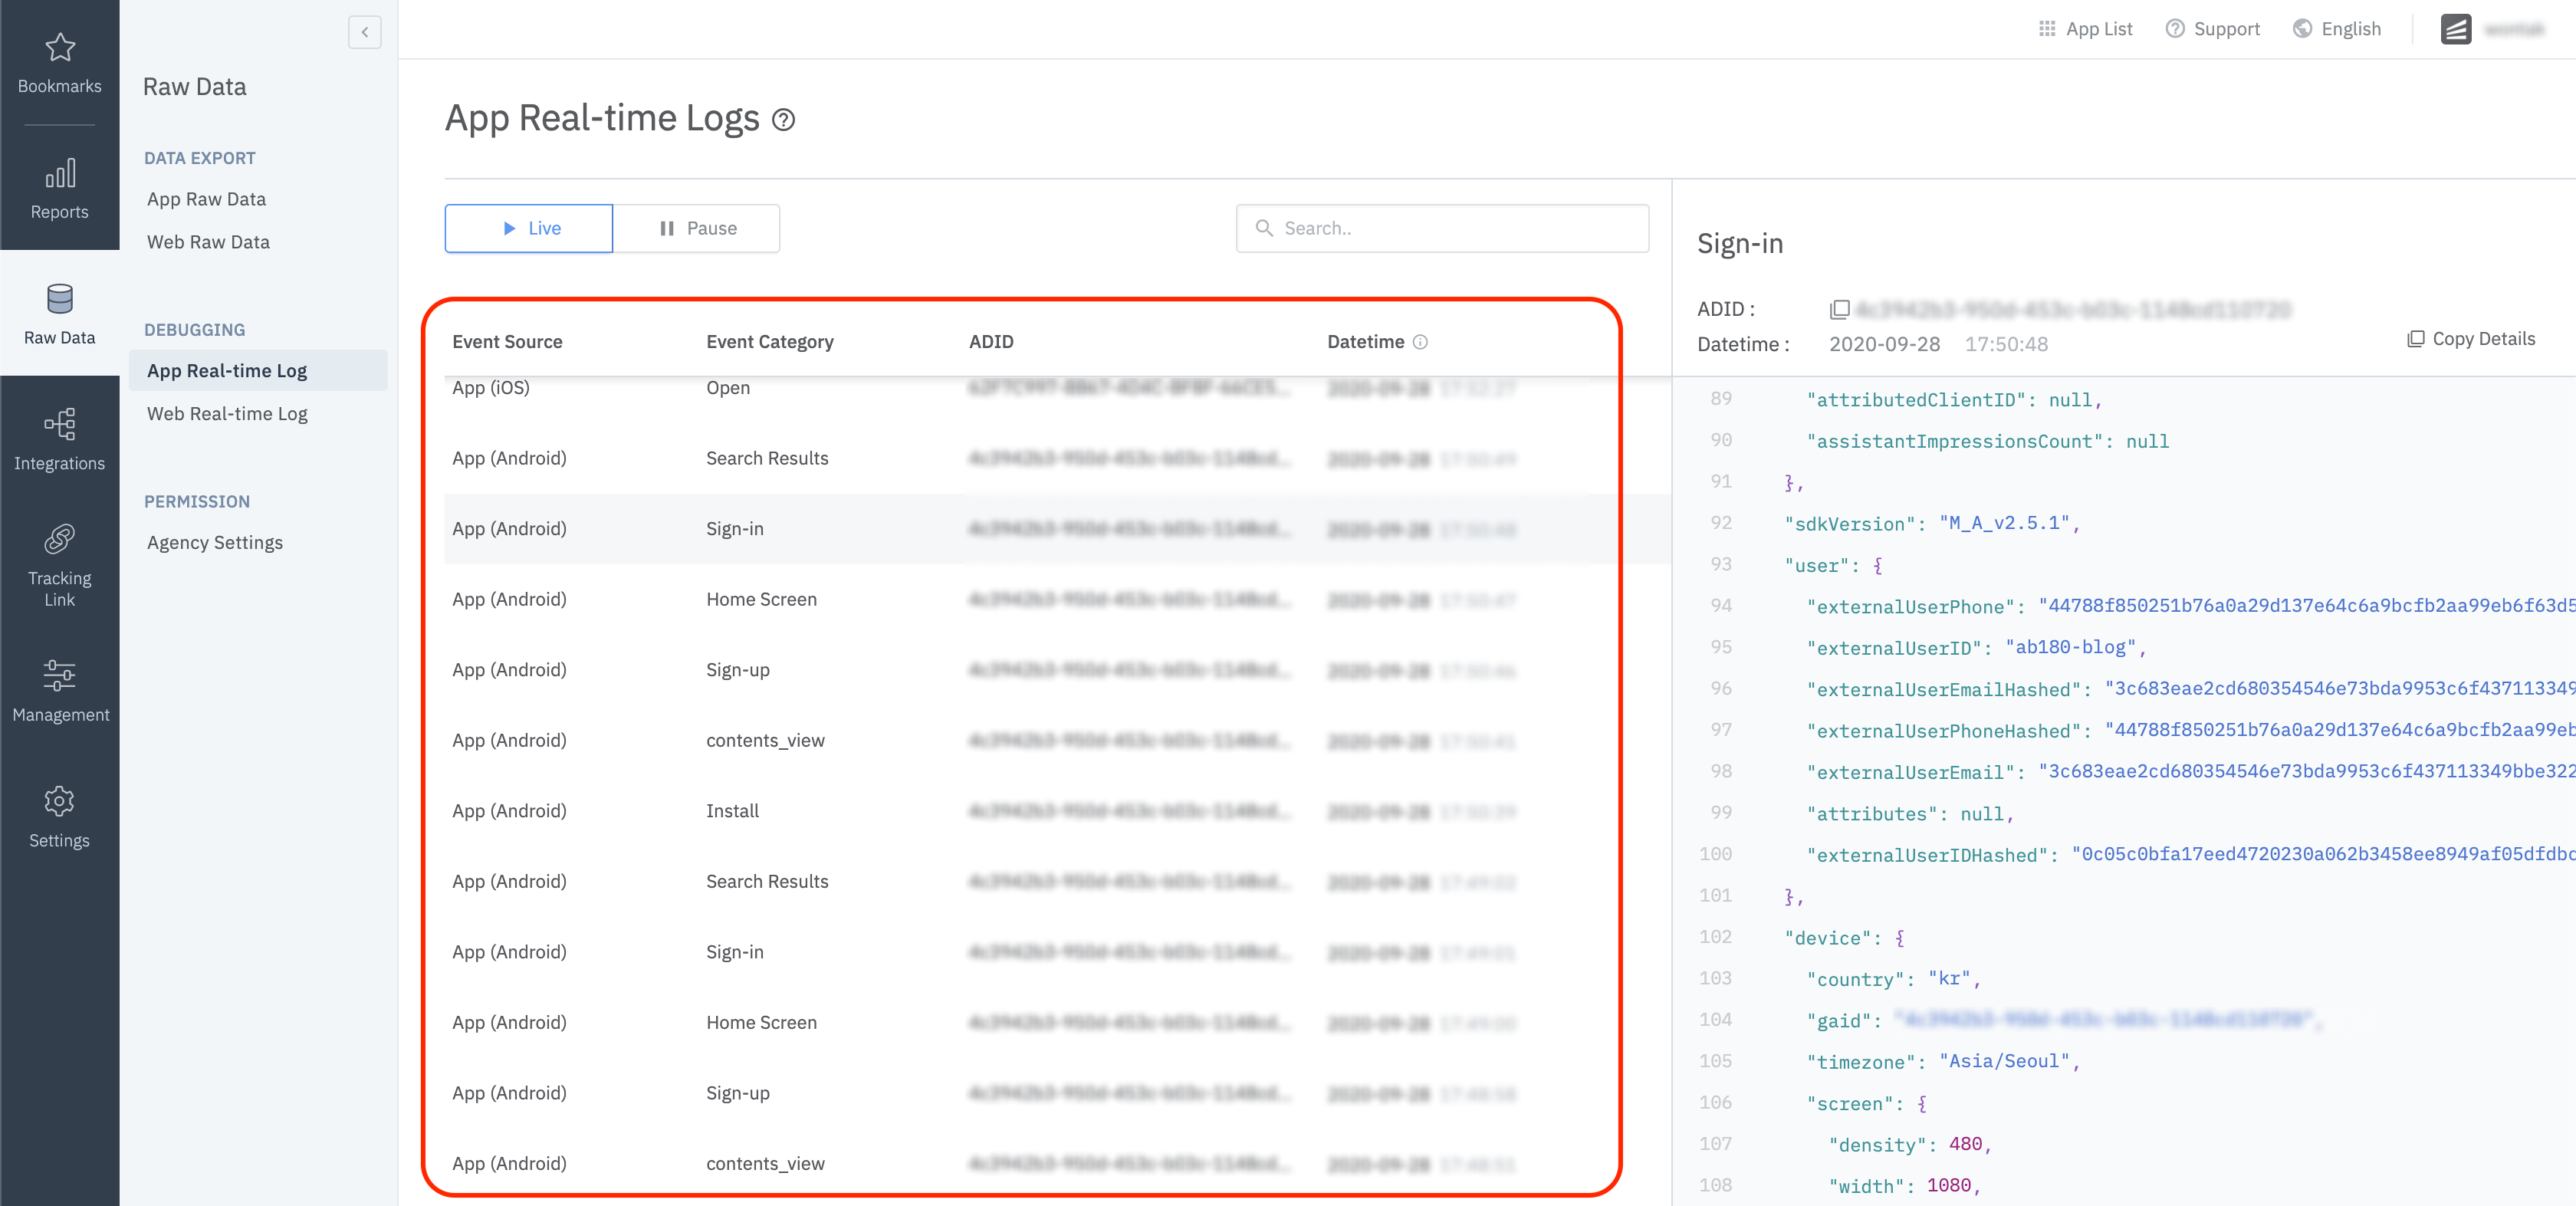
에어브릿지 SDK에서 전송된 이벤트 정보는 Airbridge 대시보드 → Raw Data → App Real-time Log 탭에서 다음과 같이 확인하실 수 있습니다.
고급 설정
SDK Signature 설정
SDK Signature 를 설정하는 것으로 SDK 를 SDK Spoofing 으로 부터 보호할 수 있습니다.
SDK 를 초기화하는 코드 상단에 setSDKSignatureSecret 함수를 호출해 설정을 변경하실 수 있습니다.
AirbridgeConfig config = new AirbridgeConfig.Builder("YOUR_APP_NAME", "YOUR_APP_SDK_TOKEN")
		.setSDKSignatureSecret("YOUR_SDK_SIGNATURE_SECRET_ID", "YOUR_SDK_SIGNATURE_SECRET")
		.build();
Airbridge.init(this, config);
val config = AirbridgeConfig.Builder("YOUR_APP_NAME", "YOUR_APP_SDK_TOKEN")
.setSDKSignatureSecret("YOUR_SDK_SIGNATURE_SECRET_ID", "YOUR_SDK_SIGNATURE_SECRET")
.build()
Airbridge.init(this, config)SDK Signature 를 설정하기 위해서는 SDK Signature Secret, SDK Signature Secret ID 2가지가 필요합니다.
해당 2가지 값을 발급받기 위해서는 담당 에어브릿지 CSM 에게 지원을 요청해주세요.
사용자 정보 해시화 설정
내부의 데이터 분석 등의 목적을 위해 HASH(SHA256)하지 않고 사용자의 식별자 정보를 전송하고 싶은 경우, 다음과 같은 설정을 통해 User Email 그리고 User Phone 정보의 해시화(SHA256)를 중단할 수 있습니다.
해당 옵션은
User Email과User Phone등 민감한 개인정보를 제 3자에게 제공하기 때문에 내부적으로 별도의 보안 조치가 선행되어져야 합니다.
// Default User Info Hash Enabled = true
AirbridgeConfig config = new AirbridgeConfig.Builder("YOUR_APP_NAME", "YOUR_APP_SDK_TOKEN")
    .setUserInfoHashEnabled(false)
    .build();
Airbridge.init(this, config);
// Default User Info Hash Enabled = true
val config = AirbridgeConfig.Builder("YOUR_APP_NAME", "YOUR_APP_SDK_TOKEN")
.setUserInfoHashEnabled(false)
.build()
Airbridge.init(this, config)세션 타임아웃 설정
Airbirdge SDK에서는 다음과 같은 처리를 통해 설정된 세션 시간 내에 유저가 앱을 재 실행 하더라도 같은 세션으로 판단하여 앱 실행 이벤트를 다시 보내지 않도록 할 수 있습니다.
// Default Session Timeout = 5 minutes
AirbridgeConfig config = new AirbridgeConfig.Builder("YOUR_APP_NAME", "YOUR_APP_SDK_TOKEN")
    .setSessionTimeoutSeconds(300)
    .build();
Airbridge.init(this, config);
// Default Session Timeout = 5 minutes
val config = AirbridgeConfig.Builder("YOUR_APP_NAME", "YOUR_APP_SDK_TOKEN")
.setSessionTimeoutSeconds(15)
.build()
Airbridge.init(this, config)개인정보보호(Opt-out) 설정
해당 기능은 GDPR이나 CCPA와 같이 고객으로부터 개인정보보호에 대한 동의를 받아 데이터 수집 및 전송을 진행하는 경우에 유용한 기능입니다.
다음과 같은 방법을 통하여 데이터 수집과 전송을 명시적으로 시작할 수 있습니다.
// Default Auto Start Tracking Enabled = true
AirbridgeConfig config = new AirbridgeConfig.Builder("YOUR_APP_NAME", "YOUR_APP_SDK_TOKEN")
    .setAutoStartTrackingEnabled(false)
    .build();
Airbridge.init(this, config);

...

// Set a variable like below
if (properties.isGDPRAccepted) {
    Airbridge.startTracking();
}
// Default Auto Start Tracking Enabled = true
val config = AirbridgeConfig.Builder("YOUR_APP_NAME", "YOUR_APP_SDK_TOKEN")
.setAutoStartTrackingEnabled(false)
.build()
Airbridge.init(this, config)
...
// Set a variable like below
if (properties.isGDPRAccepted) {
Airbridge.startTracking()
}Airbridge 링크만 추적 설정
광고주의 앱 내에서 다수의 딥링크 동작으로 인해 Airbridge를 통한 Re-engagement 성과를 한눈에 확인하기 어려운 경우, 다음과 같은 방법을 통하여 Airbridge 딥링크를 통해 들어온 성과만 필터링하도록 설정할 수 있습니다.
해당 기능을 활성화할 경우 아래의 조건을 만족한 딥링크를 통해 앱이 오픈 된 경우에 한하여 딥링크 성과로 측정합니다.
- 대시보드에 등록된 형태의 딥링크를 통해 앱이 오픈 된 경우
airbridge.io딥링크를 통해 앱이 오픈 된 경우deeplink.page딥링크를 통해 앱이 오픈 된 경우abr.ge딥링크를 통해 앱이 오픈 된 경우airbridge_referrerquery 정보가 존재하는 경우
// Default Airbridge Link Only = false
AirbridgeConfig config = new AirbridgeConfig.Builder("YOUR_APP_NAME", "YOUR_APP_SDK_TOKEN")
    .setTrackAirbridgeLinkOnly(true)
    .build();
Airbridge.init(this, config);
// Default Airbridge Link Only = false
val config = AirbridgeConfig.Builder("YOUR_APP_NAME", "YOUR_APP_SDK_TOKEN")
.setTrackAirbridgeLinkOnly(true)
.build()
Airbridge.init(this, config)페이스북 디퍼드 앱링크 설정
Facebook의 Deferred App Link를 간단한 세팅을 통하여 에어브릿지 SDK에서 함께 받아 보실 수 있습니다.
참조 - https://developers.facebook.com/docs/app-events/getting-started-app-events-android
참조 - https://developers.facebook.com/docs/app-ads/deep-linking
project/build.gradle 파일에 repository를 추가해 주세요.
allprojects {
  	...
    repositories {
        ...
        mavenCentral()
        ...
    }
    ...
}
app/build.gradle 파일의 dependencies 블럭 안에 다음 내용을 추가해 주세요.
dependencies {
    ...
    implementation 'com.facebook.android:facebook-android-sdk:latest.release'
    ...
}
app/res/values/string.xml 파일에 다음과 같은 string을 추가해 주세요.
...
<string name="facebook_app_id">FACEBOOK_APP_ID</string>
<string name="facebook_client_token">FACEBOOK_CLIENT_TOKEN</string>
...
AndroidManifest.xml 파일의 <application> 엘리먼트 안에 다음과 같은 <meta-data>를 추가해 주세요
...
<application android:label="@string/app_name" ...>
    ...
  	<meta-data android:name="com.facebook.sdk.ApplicationId" android:value="@string/facebook_app_id"/>
   	<meta-data android:name="com.facebook.sdk.ClientToken" android:value="@string/facebook_client_token"/>
    ...
</application>
...
해당 옵션을 아래와 같이 true로 설정해 주세요
// Default Facebook Deferred App Link Enabled = false
AirbridgeConfig config = new AirbridgeConfig.Builder("YOUR_APP_NAME", "YOUR_APP_SDK_TOKEN")
    .setFacebookDeferredAppLinkEnabled(true)
    .build();
Airbridge.init(this, config);
// Default Facebook Deferred App Link Enabled = false
val config = AirbridgeConfig.Builder("YOUR_APP_NAME", "YOUR_APP_SDK_TOKEN")
.setFacebookDeferredAppLinkEnabled(true)
.build()
Airbridge.init(this, config)Meta on-device attribution 수집 설정
Meta on-device attribution 수집 설정은 에어브릿지 SDK
v2.21.6이후 버전 부터 사용 가능합니다.
에어브릿지 SDK에서는 다음과 같은 방법을 통하여 Meta on-device attribution 정보를 수집할 수 있습니다.
AirbridgeConfig config = new AirbridgeConfig.Builder("YOUR_APP_NAME", "YOUR_APP_SDK_TOKEN")
    .setFacebookOnDeviceAttribution("YOUR_FACEBOOK_APP_ID")
    .build();
Airbridge.init(this, config);
val config = AirbridgeConfig.Builder("YOUR_APP_NAME", "YOUR_APP_SDK_TOKEN")
.setFacebookOnDeviceAttribution("YOUR_FACEBOOK_APP_ID")
.build()
Airbridge.init(this, config)앱 삭제 추적 설정
Firebase Messaging을 통한 앱 삭제 추적 설정은 에어브릿지 SDK
v2.6.0이후 버전 부터 사용 가능합니다.
앱 삭제 추적 설정에 대한 자세한 사항은 해당 페이지를 참조해 주세요.
위치 정보 수집 설정
에어브릿지 SDK에서는 다음과 같은 방법을 통하여 유저의 위치 정보를 수집할 수 있습니다.
위치 정보는 합법적인 목적과 방법을 통하여 수집되어야 하므로 본 기능 사용에 주의가 요구됩니다.
// Choose one
<uses-permission android:name="android.permission.ACCESS_FINE_LOCATION" />
<uses-permission android:name="android.permission.ACCESS_COARSE_LOCATION" />
...// Default Location Collection Enabled = false
AirbridgeConfig config = new AirbridgeConfig.Builder("YOUR_APP_NAME", "YOUR_APP_SDK_TOKEN")
.setLocationCollectionEnabled(true)
.build();
Airbridge.init(this, config);// Default Location Collection Enabled = false
val config = AirbridgeConfig.Builder("YOUR_APP_NAME", "YOUR_APP_SDK_TOKEN")
.setLocationCollectionEnabled(true)
.build()
Airbridge.init(this, config)에어브릿지 SDK에서는
LastKnownLocation정보를 수집하게 됩니다. GPS 정보를 가져오지 않은 상태에서는 해당 권한과 설정이 완료되었더라도 값이 존재하지 않을 수 있습니다.
앱 마켓별 유입량 측정 설정
광고주는 각각 마켓(GooglePlay Store, One Store, Huawei Store, Galaxy Store ...)에 대한 앱 설치 성과를 분석이 필요한 경우, 다음과 같이 각각의 마켓에 올라갈 앱들 대한 식별자 설정을 통하여 Airbridge 대시보드에서 구분지어 확인하실 수 있습니다.
AndroidManifest.xml을 통하여 설정하는 방법
AndroidManifest.xml을 통하여 설정하는 방법android:value에 마켓 이름(playStore, oneStore, huaweiStore, galaxyStore)를 넣어줍니다.
...
<application android:label="@string/app_name" ...>
    ...
    <meta-data android:name="co.ab180.airbridge.app_market_identifier" android:value="playStore"/>
    ...
</application>
...AirbridgeConfig를 통하여 설정하는 방법
AirbridgeConfig를 통하여 설정하는 방법setAppMarketIdentifier에 입력 값으로 마켓 이름(playStore, oneStore, huaweiStore)를 넣어줍니다.
AirbridgeConfig config = new AirbridgeConfig.Builder("YOUR_APP_NAME", "YOUR_APP_SDK_TOKEN")
    .setAppMarketIdentifier("playStore")
    .build();
Airbridge.init(this, config);
val config = AirbridgeConfig.Builder("YOUR_APP_NAME", "YOUR_APP_SDK_TOKEN")
.setAppMarketIdentifier("playStore") // oneStore, huaweiStore ...
.build()
Airbridge.init(this, config)Actual Report의 Group By에서 Event Property > App Market Identifier 혹은 Raw Data Export (App)의 Group By에서 Event Property > App Market Identifier를 선택하여 데이터를 확인할 수 있습니다.
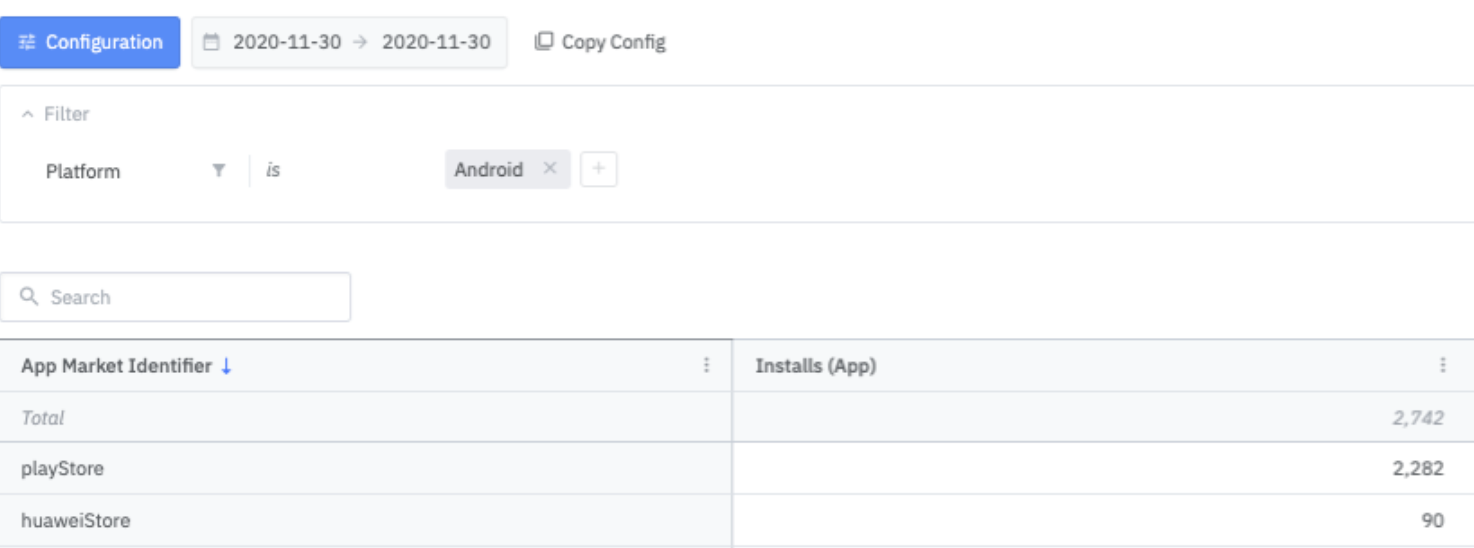
App Market Identifier 기준 설치 수
에러 로그 전송 허용 설정
에어브릿지 SDK에서는 품질 향상을 위해 SDK 내부 동작에서 의도치 않는 에러가 발생하는 경우, 해당 정보를 에어브릿지 서버에 전송하게 됩니다. 이를 원치 않으시는 경우, 다음과 같은 설정을 통해 에어브릿지 서버에 전송하지 않도록 설정할 수 있습니다.
// Default Error Log Collection Enabled = true
AirbridgeConfig config = new AirbridgeConfig.Builder("YOUR_APP_NAME", "YOUR_APP_SDK_TOKEN")
    .setErrorLogCollectionEnabled(false)
    .build();
Airbridge.init(this, config);
// Default Error Log Collection Enabled = true
val config = AirbridgeConfig.Builder("YOUR_APP_NAME", "YOUR_APP_SDK_TOKEN")
.setErrorLogCollectionEnabled(false)
.build()
Airbridge.init(this, config)이벤트 버퍼 상한선 제한 설정
에어브릿지 SDK에서는 이벤트 버퍼를 통해 이벤트 데이터 전송을 관리합니다. 다음과 같은 설정을 통해 에어브릿지 이벤트 버퍼의 상한선을 제한할 수 있습니다.
int count = 10;
long bytes = 1000000L;
AirbridgeConfig config = new AirbridgeConfig.Builder("YOUR_APP_NAME", "YOUR_APP_SDK_TOKEN")
    .setEventMaximumBufferCount(count)
  	.setEventMaximumBufferSize(bytes)
    .build();
Airbridge.init(this, config);
val count = 1_000
val bytes = 1_000_000L
val config = AirbridgeConfig.Builder("YOUR_APP_NAME", "YOUR_APP_SDK_TOKEN")
.setEventMaximumBufferCount(count)
.setEventMaximumBufferSize(bytes)
.build()
Airbridge.init(this, config)이벤트 버퍼의 크기는 메타데이터 관리 등등으로 인하여 실제로 사용하는 데이터 크기 보다 약간 적습니다.
이벤트 전송 주기 설정
에어브릿지 SDK에서는 다음과 같은 처리를 통해 이벤트 전송 주기를 설정하는 기능을 추가할 수 있습니다.
// Default Event Transmit Interval = 0 millisecond
AirbridgeConfig config = new AirbridgeConfig.Builder("YOUR_APP_NAME", "YOUR_APP_SDK_TOKEN")
	.setEventTransmitInterval(3000)
	.build();
Airbridge.init(this, config);
// Default Event Transmit Interval = 0 millisecond
val config = AirbridgeConfig.Builder("YOUR_APP_NAME", "YOUR_APP_SDK_TOKEN")
.setEventTransmitInterval(3000)
.build()
Airbridge.init(this, config)
- Interval 타임으로 음수 값 입력 시
IllegalArgumentException(런타임 에러)가 발생됩니다.
세션 안에 발생한 생명 주기 이벤트 수집 설정
에어브릿지 SDK에서는 다음과 같은 처리를 통해 세션 안에 발생한 생명 주기 이벤트(ORGANIC_REOPEN, FOREGROUND)를 수집하도록 설정할 수 있습니다.
AirbridgeConfig config = new AirbridgeConfig.Builder("YOUR_APP_NAME", "YOUR_APP_SDK_TOKEN")
	.setTrackInSessionLifeCycleEventEnabled(true)
	.build();
Airbridge.init(this, config);
val config = AirbridgeConfig.Builder("YOUR_APP_NAME", "YOUR_APP_SDK_TOKEN")
.setTrackInSessionLifeCycleEventEnabled(true)
.build()
Airbridge.init(this, config)미처리된 이벤트 삭제 설정
에어브릿지 SDK에서는 다음과 같은 처리를 통해 서버에 전송되지 못하여 디바이스 내부 DB에 저장된 이벤트들을 비워주는 기능을 추가할 수 있습니다.
AirbridgeConfig config = new AirbridgeConfig.Builder("YOUR_APP_NAME", "YOUR_APP_SDK_TOKEN")
	.setResetEventBufferEnabled(true)
	.build();
Airbridge.init(this, config);
val config = AirbridgeConfig.Builder("YOUR_APP_NAME", "YOUR_APP_SDK_TOKEN")
.setResetEventBufferEnabled(true)
.build()
Airbridge.init(this, config)앱내에서 트래킹링크 사용
Airbridge SDK는 앱 내에서 트래킹 링크를 열 수 있는 기능을 제공해 브라우저를 거치지 않고도 다른 화면으로 이동할 수 있습니다.
Airbridge.click("https://abr.ge/~~~")
Airbridge.impression("https://abr.ge/~~~")
click
해당 트래킹 링크가 클릭되었을 때 호출합니다. 그 후 트래킹 링크의 click 통계를 추가하고 설정된 App, Web 또는 Fallback으로 이동합니다.
impression
해당 트래킹 링크 가 UI에 표시 되었을 때 호출합니다. 그 후 트래킹 링크의 impression 통계를 1개 추가합니다.
커스텀 도메인 사용 시, 커스텀 Short ID를 포함한 트래킹 링크는 사용할 수 없습니다.
- example1) http://deeplink.ab180.co/custom → 사용불가
- example2) http://deeplink.ab180.co/a3b1c2 → 사용가능
- example3) https://abr.ge/a3b1c2 → 사용가능
Attribution Result 콜백 설정
에어브릿지 SDK에서는 다음과 같은 처리를 통해 Attribution Result 데이터를 전달받을 수 있습니다.
AirbridgeConfig config = new AirbridgeConfig.Builder("YOUR_APP_NAME", "YOUR_APP_SDK_TOKEN")
	.setOnAttributionResultReceiveListener(new OnAttributionResultReceiveListener() {
		@Override
		public void onAttributionResultReceived(@NonNull Map<String, String> result) {
			// Process attribution data
		}
	})
	.build();
Airbridge.init(this, config);
val config = AirbridgeConfig.Builder("YOUR_APP_NAME", "YOUR_APP_SDK_TOKEN")
.setOnAttributionResultReceiveListener(object : OnAttributionResultReceiveListener {
override fun onAttributionResultReceived(result: Map<String, String>) {
// Process attribution data
}
})
.build()
Airbridge.init(this, config)-
Attribution Result 콜백을 통해 다음과 같은 데이터를 전달받을 수 있습니다.
필드명 설명 attributedChannel 채널 (String) attributedCampaign 캠페인 (String) attributedAdGroup 광고 그룹 (String) attributedAdCreative 광고 소재 (String) attributedContent 콘텐츠 (String) attributedTerm 키워드 (String) attributedSubPublisher 하위매체 (String) attributedSubSubPublisher1 하하위매체 1 (String) attributedSubSubPublisher2 하하위매체 2 (String) attributedSubSubPublisher3 하하위매체 3 (String) -
Unattributed 즉, 기여 결과가 없는 경우 Attribution Result 콜백을 통해 다음과 같은 데이터를 전달받습니다.
{
	"attributedChannel": "unattributed"
}
Attribution 값 사용에 대한 가이드라인:
- 기여 결과가 존재하는 경우
- Attribution 값은 SDK 초기화 후 대체로 40초 내외에 콜백으로 전달됩니다.
- 앱이 종료되어 이전에 Attribution 값을 전달받지 못한 경우, 다음 앱 실행 시 SDK 초기화 후 40초 내외에 Attribution 값이 전달됩니다.
- 드물게 최대 5분까지 전달이 지연될 수 있습니다.
- 기여 결과가 존재하지 않는 경우
SDK를 초기화한 이후, 최소 3시간이 경과한 후 앱 재실행 시 Attribution 값이 전달됩니다.
실시간 처리가 필요한 부분에는 콜백으로 전달되는 Attribution 값을 활용하는 것은 권장하지 않습니다.
Airbridge 비활성화 설정
에어브릿지 SDK에서는 다음과 같은 처리를 통해 에어브릿지의 모든 기능을 끄도록 설정할 수 있습니다.
AirbridgeConfig config = new AirbridgeConfig.Builder("YOUR_APP_NAME", "YOUR_APP_SDK_TOKEN")
	.setSdkEnabled(false)
	.build();
Airbridge.init(this, config);
val config = AirbridgeConfig.Builder("YOUR_APP_NAME", "YOUR_APP_SDK_TOKEN")
.setSdkEnabled(false)
.build()
Airbridge.init(this, config)"미처리된 이벤트 삭제 설정"과 "Airbridge 비활성화 설정"이 모두 설정된 경우, "Airbridge 비활성화 설정"이 우선되어지기 때문에 "미처리된 이벤트 삭제 설정"은 동작하지 않습니다.
하이브리드 앱 설정
Web SDK만의 설치로는 앱 설치 및 실행 또는 딥링크 호출 등의 추가적인 이벤트를 트래킹 할 수가 없습니다. Airbridge에서는 다음과 같은 설정을 통하여 쉽게 하이브리드 앱에서 인앱 이벤트를 호출할 수 있습니다.
하이브리드 앱 연동을 위해서는 반드시 에어브릿지 SDK의 설치 및 설정이 미리 선행되어야 합니다.
WebView 환경 이벤트 전송
참조 - Building web apps in WebView
참조 - Understanding Android webview javascript interface
대상 Web View에 다음과 같이 Airbridge::setJavascriptInterface 함수를 호출해 주세요.
public class MainActivity extends Activity {

    @Override
    protected void onCreate(Bundle savedInstanceState) {
        super.onCreate(savedInstanceState);
        setContentView(R.layout.activity_main);
        initWebView();
    }

    void initWebView() {
        webView = findViewById(R.id.webView);
        webView.getSettings().setJavaScriptEnabled(true);
        webView.getSettings().setDomStorageEnabled(true);

        Airbridge.setJavascriptInterface(webView, "YOUR_WEB_SDK_TOKEN");

        webView.setWebChromeClient(new WebChromeClient());
        webView.setWebViewClient(new WebViewClient());
        webView.loadUrl("http://dev.blog.airbridge.io/websdk-web-app/");
    }
}
class MainActivity : Activity() {
override fun onCreate(savedInstanceState: Bundle) {
super.onCreate(savedInstanceState)
setContentView(R.layout.activity_main)
initWebView()
}
fun initWebView() {
webView.settings.javaScriptEnabled = true
webView.settings.domStorageEnabled = true
Airbridge.setJavascriptInterface(webView, "YOUR_WEB_TOKEN")
webView.webChromeClient = WebChromeClient()
webView.webViewClient = WebViewClient()
webView.loadUrl("http://my_company.com/main")
}
}해당 YOUR_WEB_SDK_TOKEN은 Airbridge 대시보드 → Settings → Tokens 탭에서 확인하실 수 있습니다.
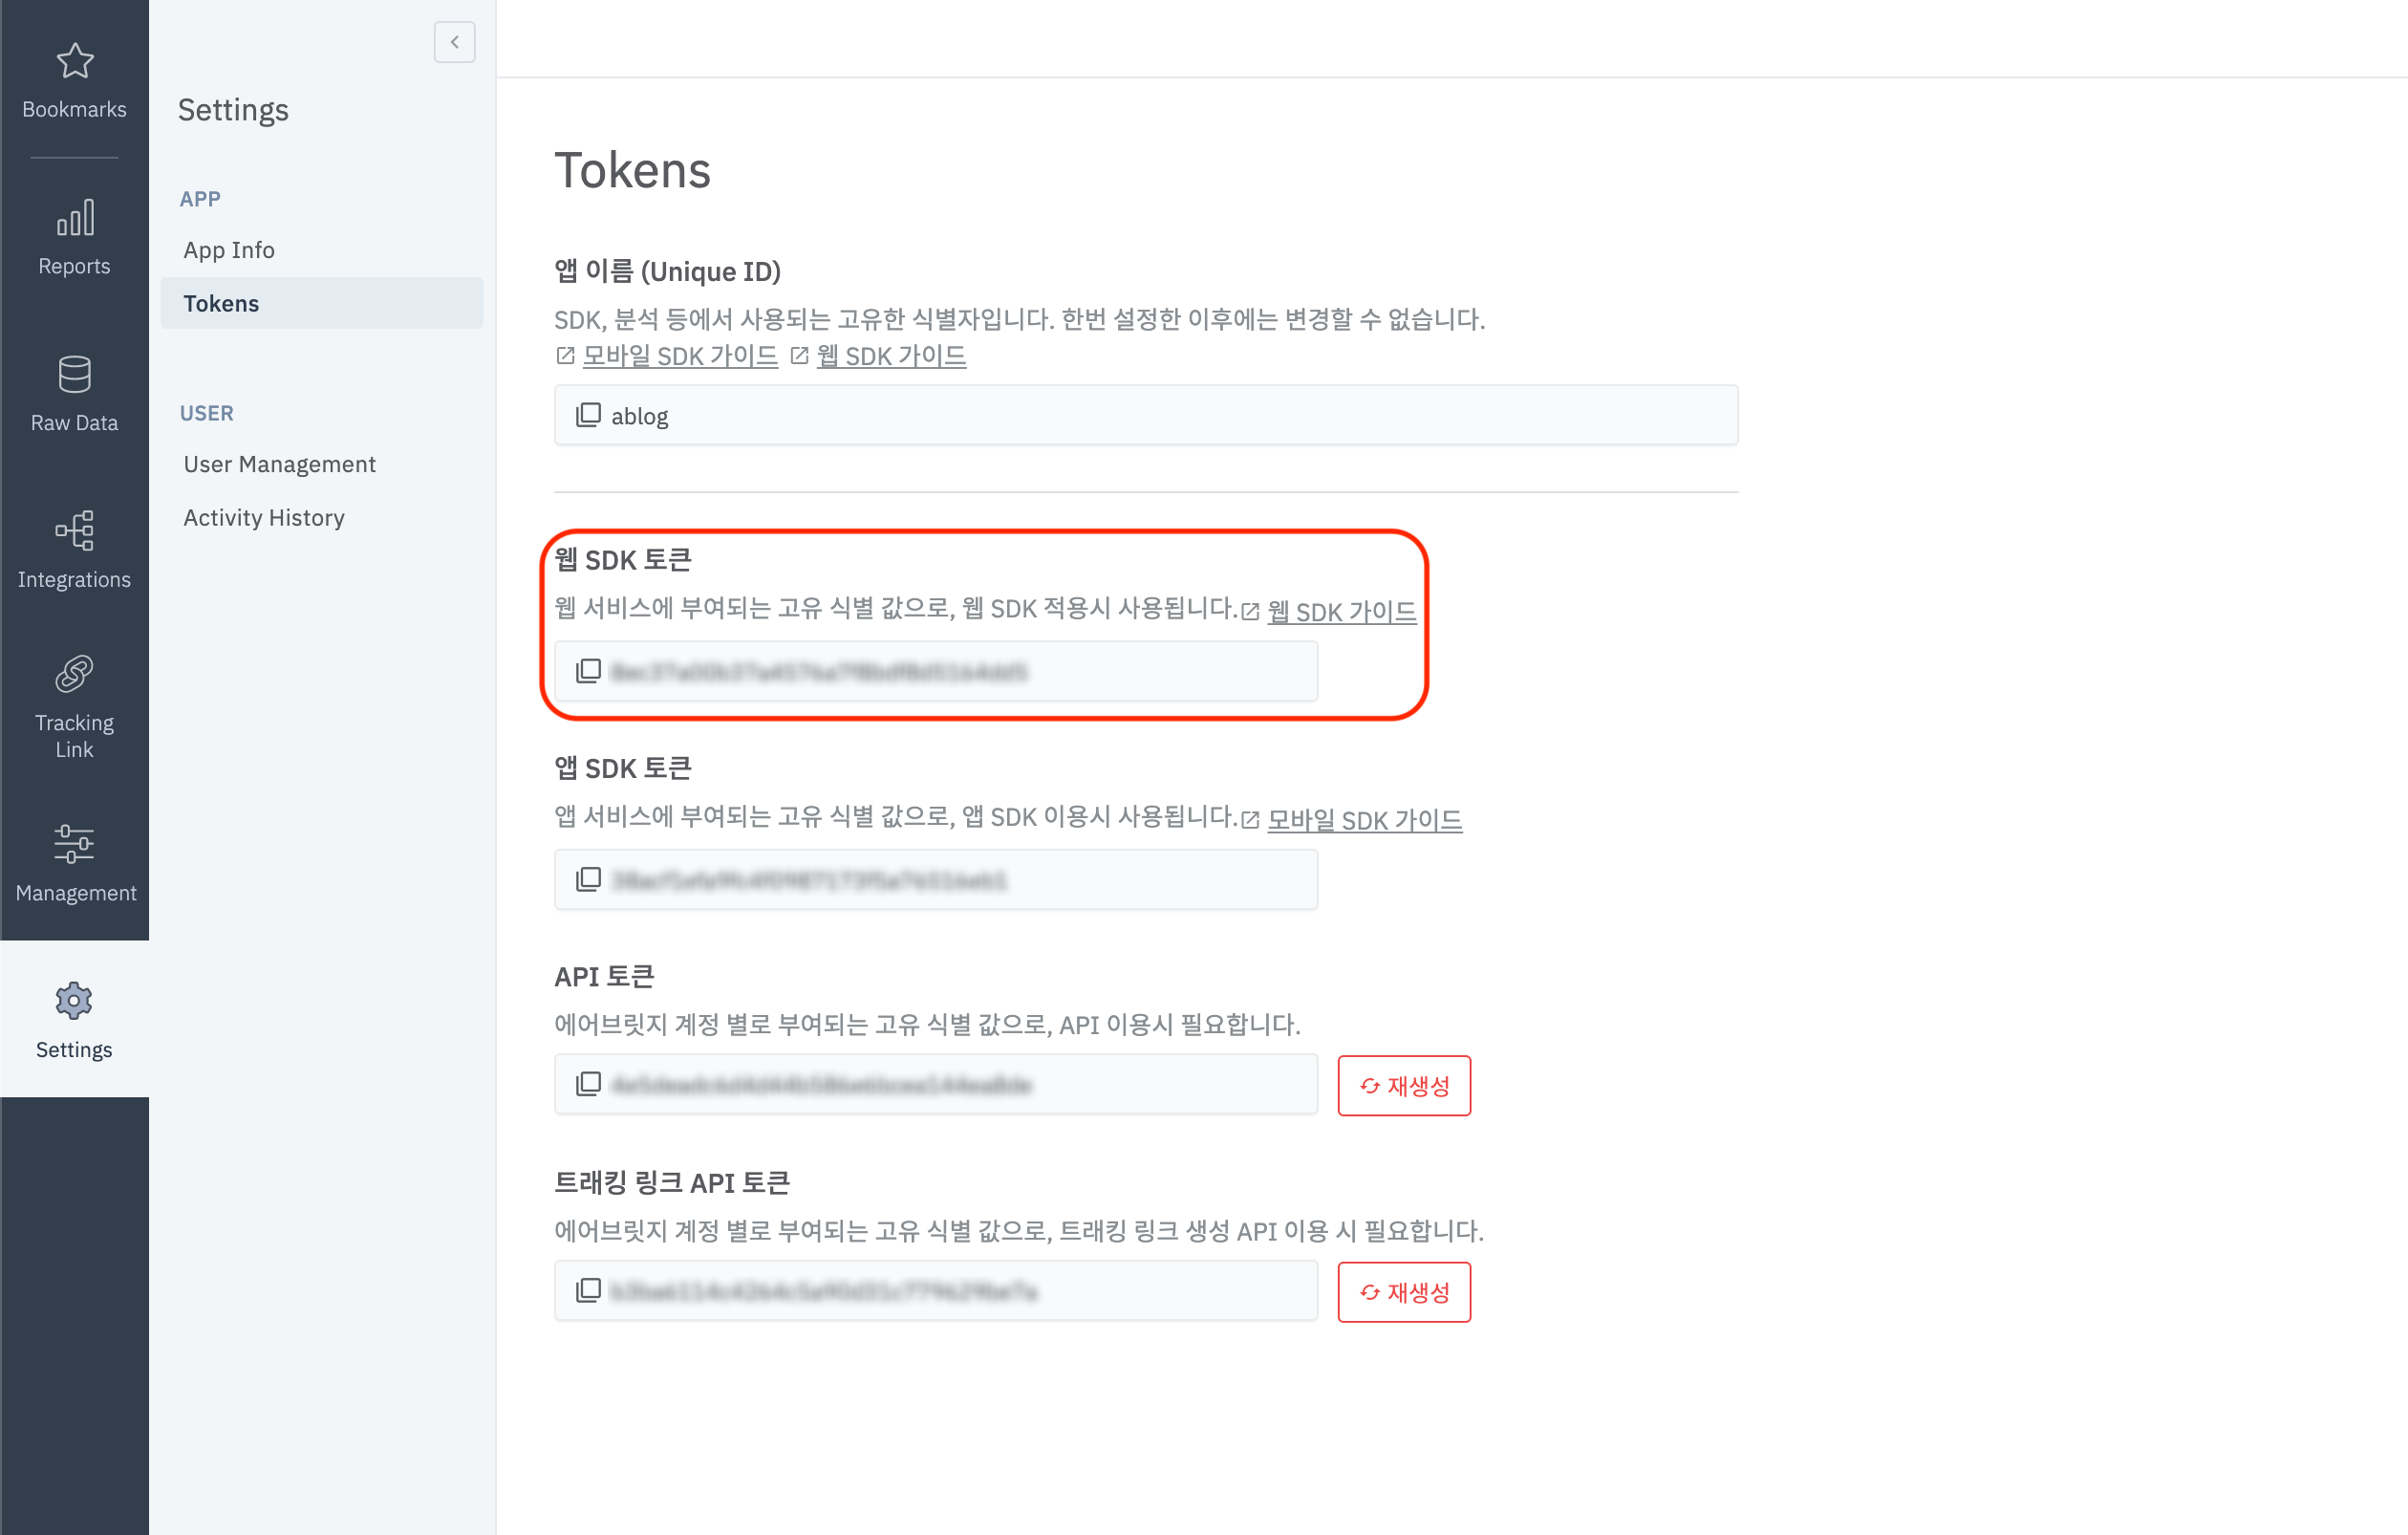
해당 설정이 완료 되면 실제 사용할 웹 페이지에서 이용가이드를 따라 Web SDK를 초기화해 주세요.
Web SDK 이용가이드: 링크
Troubleshooting
Ad ID permission
LAT(LimitAdTracking)를 비활성화한 상태에서 GAID가 00000000-0000-0000-0000-000000000000으로 잡히는 이슈
00000000-0000-0000-0000-000000000000으로 잡히는 이슈- AndroidManifest.xml 파일을 열어주세요.
com.google.android.gms.permission.AD_ID권한을 다음과 같이 추가해 주세요
<manifest ...>
  ...
  <uses-permission android:name="com.google.android.gms.permission.AD_ID" />
  ...
</manifest>Braze push notification
Braze SDK 를 사용하여 push notification 을 통해 deeplink 를 open 할 시 airbridge 에서 event 가 DEEPLINK OPEN 이 안잡히고 OPEN 이 발생합니다.
Airbridge SDK 는 event 확인을 위해서 activity 의 action 과 intent 의 dataString 으로 전달 되는 값을 통해 DEEPLINK OPEN ,OPEN 등을 판별 하고 있습니다. 그러나 Braze SDK 에 push notification 을 생성시 Braze SDK 에 정의 된 NotificationTrampolineActivity 을 통해서 open 되는데 해당 activity Action 과 intent 에서 dataString 값을 확인 할 수 없어서 발생하게 됩니다.
airbridge android SDK v2.21.5 에서 추가된 아래 interface 를 통해 해당 내용을 해결 할 수 있습니다.
AirbridgeConfig config = new AirbridgeConfig.Builder("YOUR_APP_NAME", "YOUR_APP_SDK_TOKEN")
	.setLifecycleIntegration(new AirbridgeLifecycleIntegration() {
    @Nullable
    @Override
    public String getDataString(@NotNull Activity activity) {
      if (activity.getClass().getName().equals("com.braze.push.NotificationTrampolineActivity")
          && activity.getIntent() != null
          && activity.getIntent().getExtras() != null) {
        return activity.getIntent().getExtras().getString("uri");
      }
    }
  })
	.build();
Airbridge.init(this, config)
val config = AirbridgeConfig.Builder("YOUR_APP_NAME", "YOUR_APP_SDK_TOKEN")
.setLifecycleIntegration {
it.takeIf { it.javaClass.name == "com.braze.push.NotificationTrampolineActivity" }
?.run { intent?.extras?.getString("uri") }
}
.build()
Airbridge.init(this, config)deeplink.page
deeplink.page 는 airbridge android SDK v2.21.1 버전에서 deprecated 되었습니다. 그렇지만 내부 동작을 통해 여전히 지원 및 동작은 되고 있습니다.
airbridge android SDK v2.21.0 이하 버전을 사용중이라면 하단에 명시된 절차에 따라서 Intent Filter를 설정해 주세요.
- AndroidManifest.xml 파일을 열어주세요.
- 딥링크를 처리할 Acitivty에 Intent Filter를 다음과 같이 추가해 주세요
<activity ...>
    ...
    <intent-filter android:autoVerify="true">
        <action android:name="android.intent.action.VIEW" />
        <category android:name="android.intent.category.DEFAULT" />
        <category android:name="android.intent.category.BROWSABLE" />

        <data android:scheme="http" android:host="YOUR_APP_NAME.deeplink.page" />
        <data android:scheme="https" android:host="YOUR_APP_NAME.deeplink.page" />
    </intent-filter>
    <intent-filter android:autoVerify="true">
        <action android:name="android.intent.action.VIEW" />

        <category android:name="android.intent.category.DEFAULT" />
        <category android:name="android.intent.category.BROWSABLE" />

        <data android:scheme="http" android:host="YOUR_APP_NAME.airbridge.io" />
        <data android:scheme="https" android:host="YOUR_APP_NAME.airbridge.io" />
    </intent-filter>
    <intent-filter>
        <action android:name="android.intent.action.VIEW" />

        <category android:name="android.intent.category.DEFAULT" />
        <category android:name="android.intent.category.BROWSABLE" />

        <data android:scheme="YOUR_APP_URI_SCHEME" />
    </intent-filter>
</activity>
Dependencies
java.lang.NoClassDefFoundError: kotlin/coroutines/AbstractCoroutineContextKey 문제
java.lang.NoClassDefFoundError: kotlin/coroutines/AbstractCoroutineContextKey 문제java.lang.NoClassDefFoundError: kotlin/coroutines/AbstractCoroutineContextKey
at java.base/java.lang.ClassLoader.defineClass1(Native Method)
at java.base/java.lang.ClassLoader.defineClass(ClassLoader.java:1016)
...참조 - https://github.com/Kotlin/kotlinx.coroutines/issues/1879
@qwwdfsad에 따르면 kotlinx-coroutines-core 라이브러리 1.3.5 이상의 버전을 사용 시 반드시 kotlin-stdlib 라이브러리 버전 1.3.70 이상을 사용하도록 강제하고 있습니다.
gradlew dependencies 커멘드를 통해 현재 포함된 kotlinx-coroutines-core 라이브러리 버전이 1.3.5 이상인 경우 kotlin-stdlib 라이브러리 버전이 1.3.70 이상인지 확인해 주세요.
Auto Backup
안드로이드 앱에서 Auto Backup이 필요로 하는 경우 Auto Backup Rules의 정의가 필요할 수 있습니다. 이 같은 경우에 에어브릿지 SDK에서는 내부 데이터의 자동 복제를 방지하기 위하여 별도의 airbridge_auto_backup_rules.xml을 AndroidManifest.xml에 정의하고 있어 빌드 시 Manifest merger failed : Attribute application@fullBackupContent value=(true)과 같은 충돌이 발생할 수 있습니다.
다음과 같은 충돌이 발생한 경우 tools:replace="android:fullBackupContent"의 설정과 해당 커스터마이즈 된 auto backup rule 파일에 추가적인 Merging 작업을 필요로 합니다.
에어브릿지 SDK에서 정의하는 Auto Backup Rules는 다음과 같습니다.
<?xml version="1.0" encoding="utf-8"?>
<full-backup-content>
    <exclude domain="sharedpref" path="airbridge-internal" />
    <exclude domain="sharedpref" path="airbridge-install" />
    <exclude domain="sharedpref" path="airbridge-user-info" />
    <exclude domain="sharedpref" path="airbridge-user-alias" />
    <exclude domain="sharedpref" path="airbridge-user-attributes" />
    <exclude domain="database" path="airbridge.db" />
</full-backup-content>
Double brace initialization Issue
HashMap<String, Object> semanticAttributes = new HashMap();
semanticAttributes.put("products", Arrays.asList(
        // double brace initialization issue
        new HashMap<String, Object>() {{
            put("name", "MacBook Pro");
            put("price", 1548200);
            put("position", 1);
            put("brandID", 23);
            put("brandName", "apple");
        }},
        new HashMap<String, Object>() {{
            put("name", "MacBook Air");
            put("price", 1500000);
            put("position", 2);
            put("brandID", 23);
            put("brandName", "apple");
        }}
    )
);
semanticAttributes.put("totalValue", 3048200);

HashMap<String, Object> customAttributes = new HashMap();
customAttributes.put("customKey", "customValue");

Airbridge.trackEvent(
    "purchase",
    "action",
    "label",
    3048200,
    customAttributes,
    semanticAttributes
);
Android SDK는 Google의 GSON 라이브러리를 사용중이며, 해당 라이브러리에 Double Brace Initialization 관련 Known Issue가 존재합니다. 하여 위 Java 코드와 같이 Products 객체를 만들때 Double Brace Initialization를 사용하면 products 데이터가 누락될 수 있기 때문에, 결제 완료의 예시 코드처럼 직접 Product 객체를 만들어 사용하시는 것을 권장드립니다.
Updated 9 months ago


